Getting started with recast graphs
How to set up your first recast graph and using it in a scene.

We'll create a scene with some obstacles, add a recast graph to it, and then add an agent that can move around in the scene.
We'll base it on the same scene as in the Get Started Guide, but digging a bit deeper into the settings of the recast graph, and improving the navmesh a bit.
If you have just followed the Get Started Guide, you can keep your scene, and start at the How the recast graph works section.
Contents
- Example scenes with recast graphs
- Creating a scene with some obstacles
- Adding Pathfinding
- Adjusting the graph to our scene
- How the recast graph works
- Adding an agent
- Improving the navmesh
- Updating recast graphs
- Conclusion
Example scenes with recast graphs
The package includes several example scenes with recast graphs.
Creating a scene with some obstacles
Create a new empty scene, name it "PathfindingTest".
The agent needs something to walk on, and something for it to avoid.

Add a plane to the scene, place it at the scene origin (0,0,0) and scale it to (10,10,10).
Then create some cubes of different scales and place them on the plane; these will be obstacles which the agent should avoid.
You can optionally add some materials to the objects, to make them look nicer.
Your scene should now look something like in the image
Adding Pathfinding
Add a new empty GameObject to the scene, name it "A*".
Attach the AstarPath component to the GameObject.
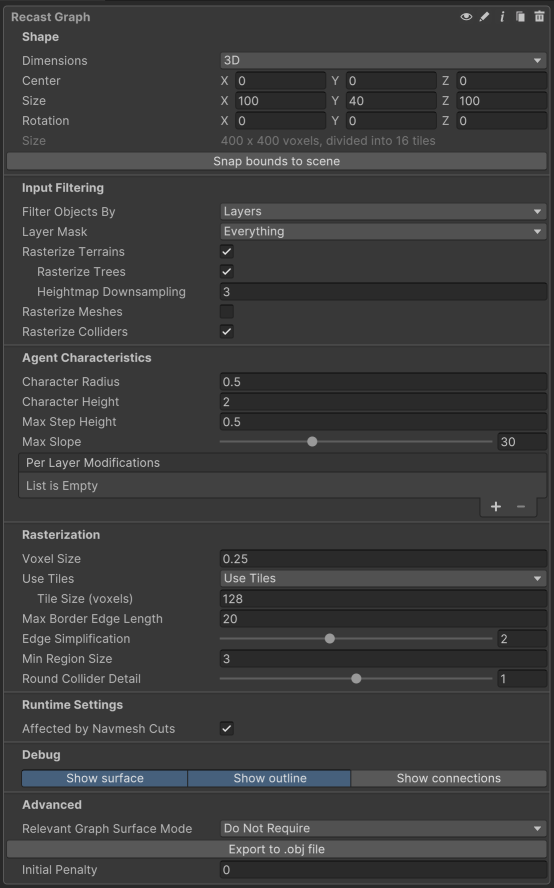
Open the A* inspector, and add a new RecastGraph.
The recast graph is only available in the pro version of the package.
Click on the graph's label to expand its settings.
Adjusting the graph to our scene
We can pretty easily get a decent navmesh for our scene by adjusting just a single setting.
In the scene view, you'll see a white bounding box. This box represents the area that the graph will cover.
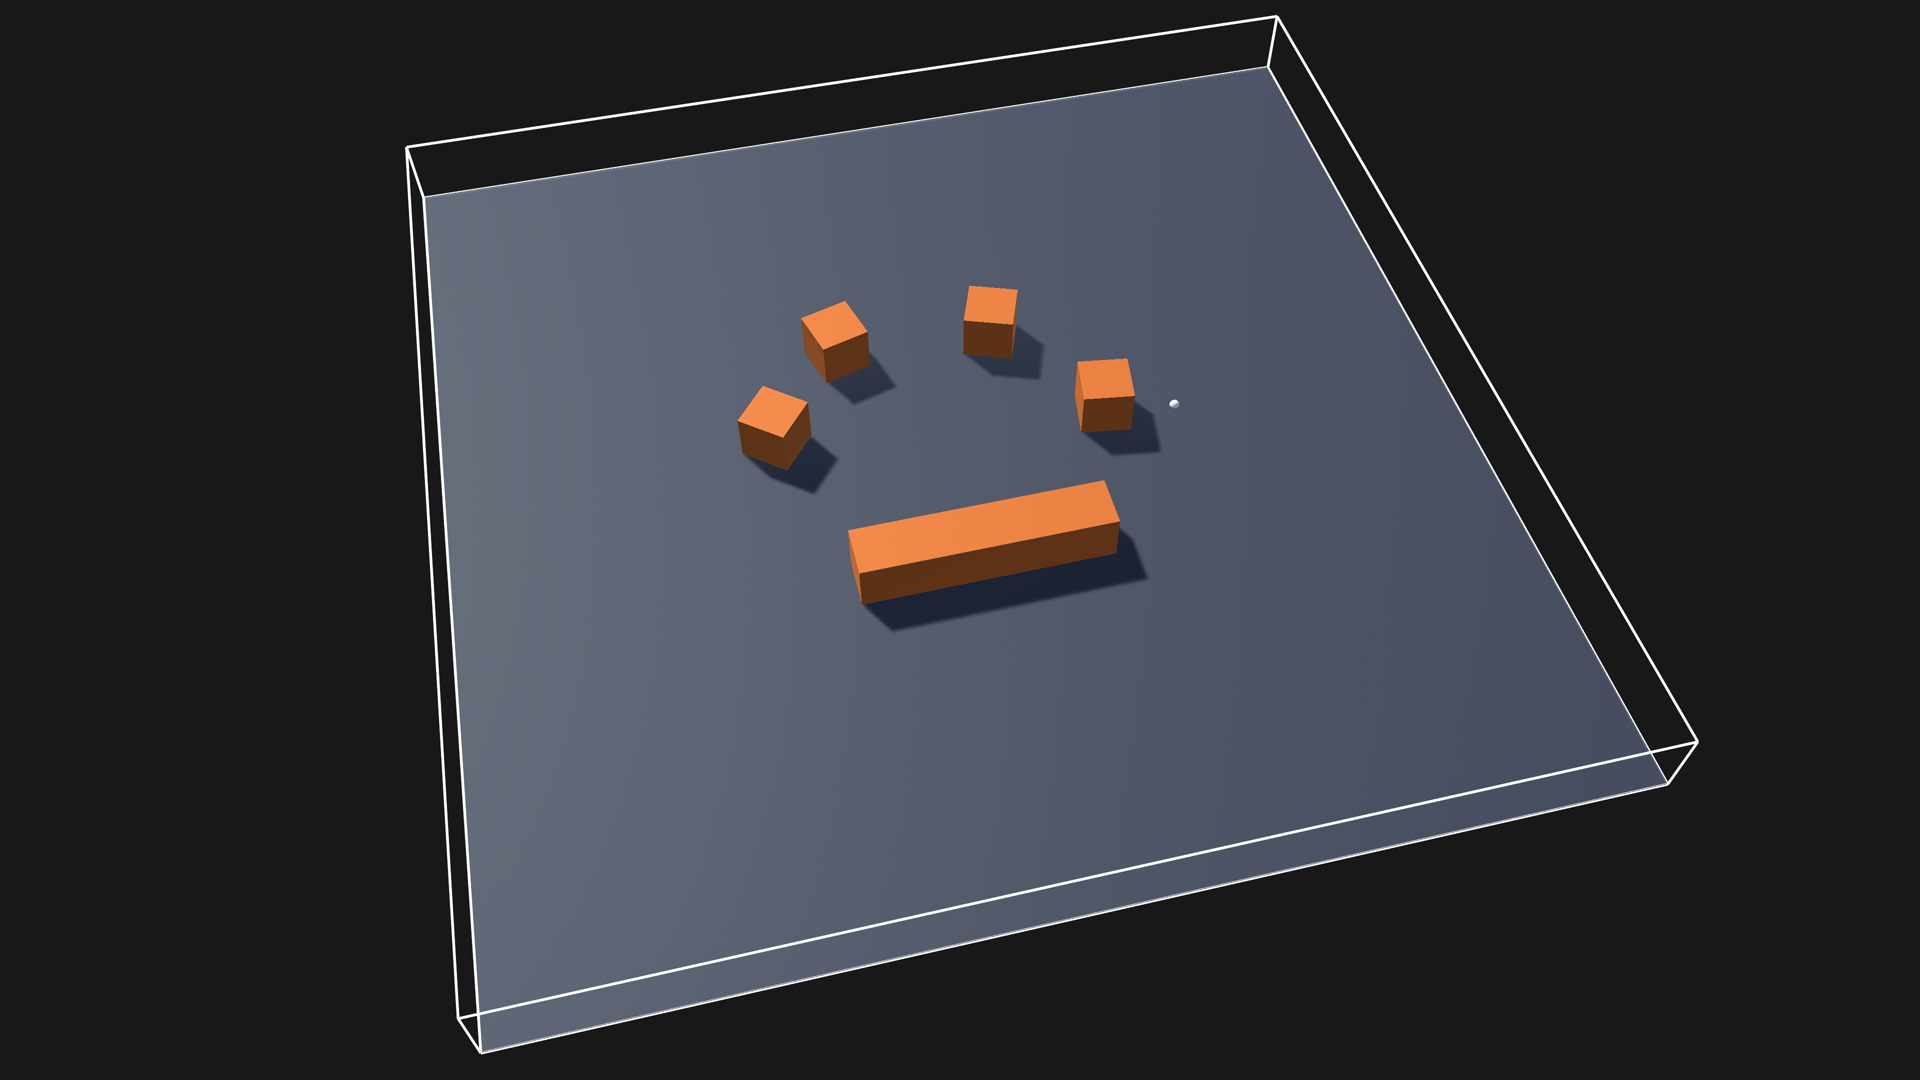
Click the Snap Bounds To Scene button, in the recast graph inspector.
You should see that the graph's bounding box has been resized to cover the entire scene.
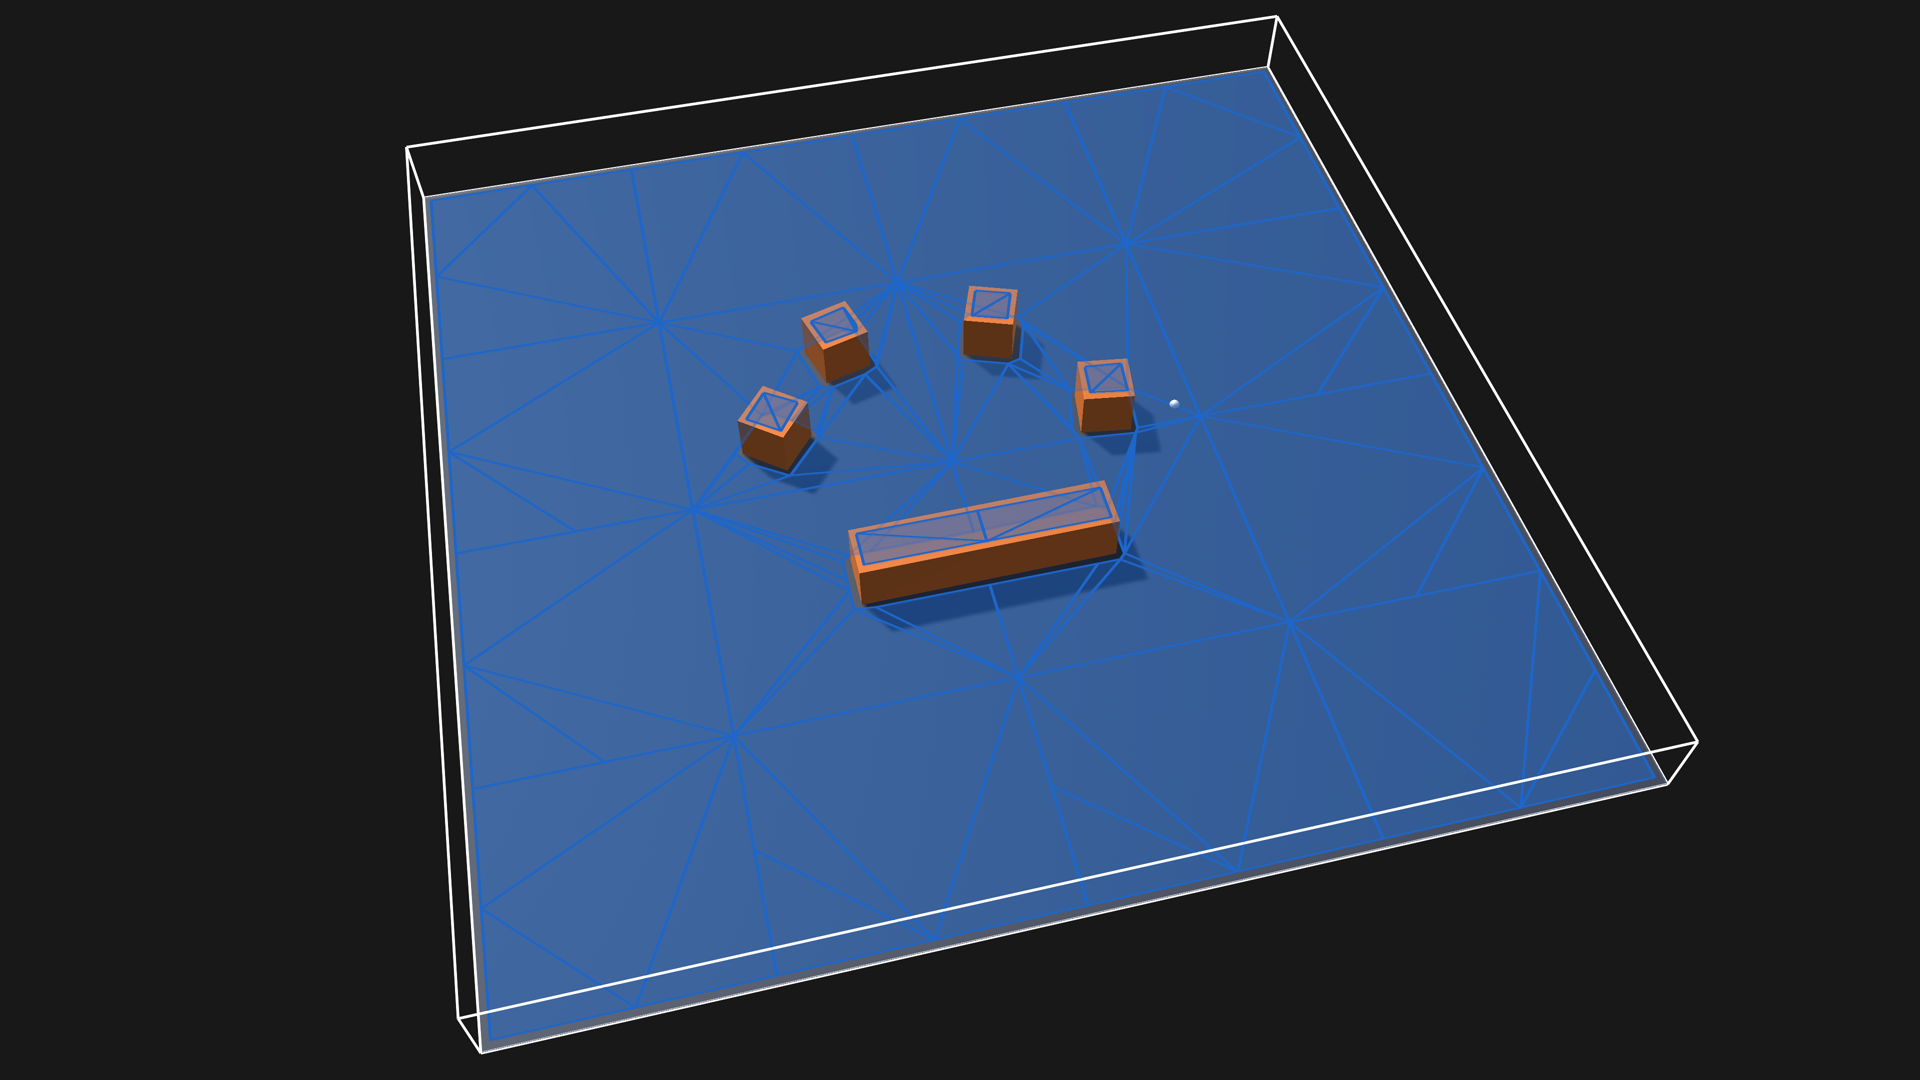
Now, we can click the Scan button, at the bottom of the inspector, to calculate the graph.
Or use the keyboard shortcut: Cmd+Alt+S (mac) or Ctrl+Alt+S (windows).
If you have done everything correctly, you should now have a generated navmesh in your scene.
How the recast graph works
From a high level, the recast graph works like this:
It takes as input the scene geometry (either colliders, or rendered meshes).
It then voxelizes this geometry into tons of small boxes. This looks similar to a minecraft representation of the world, but with much smaller boxes.
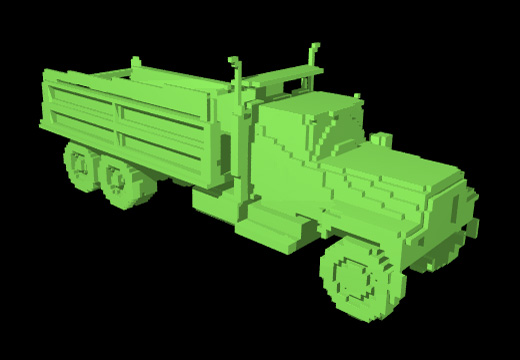
It then simplifies this voxelized representation, to make it more manageable. Trying to figure out where an agent could walk.
Finally, it triangulates the surface to get a navmesh.
RecastGraph, for more details about how the recast graph works under the door.
Recast Graph settings
There are many settings in the recast graph. Here I'll describe the most important ones.
RecastGraph, for a complete list of all settings.

At the top, you'll find a switch for if the graph should use 2D mode or 3D mode. Take a look at Pathfinding in 2D for more information about 2D pathfinding.
After this you'll find the bounding box. It decides which area of the world the graph will cover. You can change its center, size, and even rotation, to make it fit your scene.
You can also adjust the bounds using the handles in the scene view, using the normal translation, scaling and rotation tools.
Try this out: use the 3D scaling tool in the scene view to modify the bounds of the graph. Then scan the graph to see how it changes.
Small blue handles will show up on the bounds in the scene view, when the scaling tool is active.

This section decides which objects the graph should use as input. Typically you'll want to include every static object in the scene that the agent can walk on, or that should be avoided.
You can filter either using layers or tags. However, I recommend using layers, since this is a bit more performant.
You can also enable or disable types of objects: terrains, meshes, and colliders.
There's not always a clear best choice between using meshes or colliders as inputs to the recast graph.
Meshes can often contain more detail, and can therefore give you a slightly more accurate navmesh. However, colliders are typically more performant, when scanning or updating the graph. Therefore, they are the recommended choice for most games.
Colliders also have the benefit of being solid. For a mesh, by contrast, the system cannot know what is inside the object, and what is outside it, only the surfaces matter. This can result in a navmesh being generated inside of objects when rasterizing meshes.
Try this out: enable Rasterize Meshes, and disable Rasterize Colliders. Then scan the graph. You'll most likely see that a navmesh has been generated inside of the boxes.

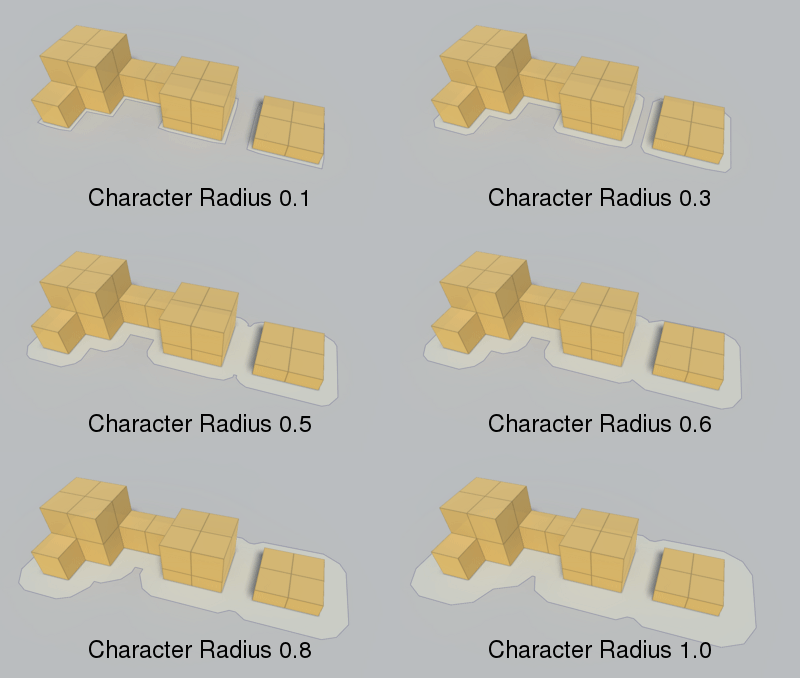
In this section you can configure the size and capabilities of the agents that will be walking on the navmesh. For this tutorial, we'll use the default settings.
Try this out: change the Character Radius to 0.5, 1.0 and 2.0, scanning the graph after each change.
Try using the keyboard shortcut for scanning the graph: Cmd+Alt+S (mac) or Ctrl+Alt+S (windows).
The character radius will be rounded up to the nearest multiple of the voxel size, described in the next section.
If you need agents with drastically different sizes or capabilities, take a look at Multiple agent types.

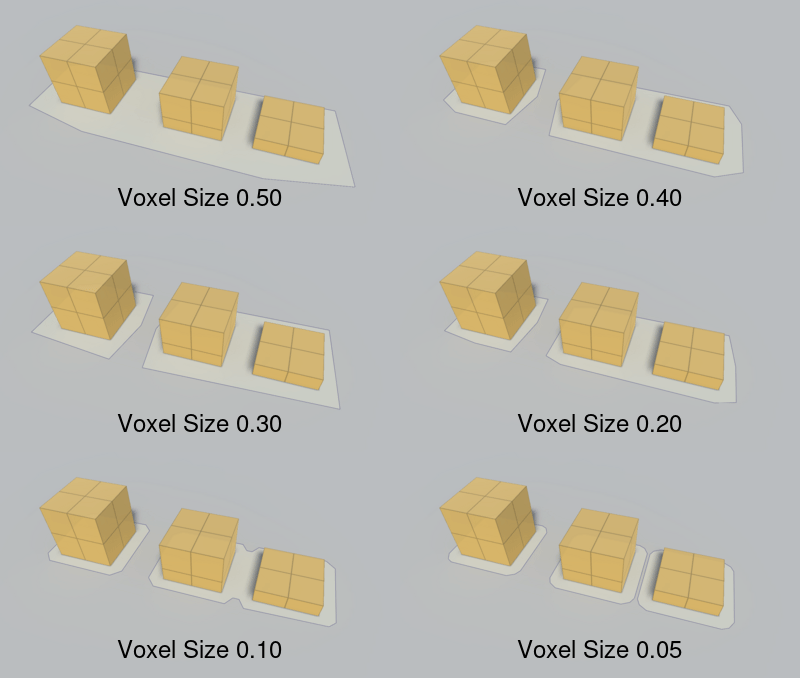
This section contains settings that control how the voxelization and simplification of the world geometry is done.
The most important setting here is the Voxel Size.
This is essentially the resolution of the graph. A smaller value will give you a more detailed navmesh, but it will also be slower to calculate. Pathfinding performance is not affected that much, however, since the pathfinding is done on the nodes (triangles) of the graph, not on the voxels, and the number of nodes doesn't tend to increase that much when you decrease the voxel size.
If your graph is too slow to scan, this is the first setting you should try to tweak.
Try this out: change the Voxel Size to different values, for example 0.1, 0.5 and 2.0, scanning the graph after each change.
Try using the keyboard shortcut for scanning the graph: Cmd+Alt+S (mac) or Ctrl+Alt+S (windows).
Notice how the detail in the navmesh changes when you change the voxel size.
For our scene, we can use a voxel size of 0.25m.

Try this out in your scene: Look at the graph from above in the scene view. You should see that the navmesh is split into tiles.
You rarely have to change any of the remaining settings in this section. So I'll skip over them here. But you can read more about them in the RecastGraph docs.
Adding an agent
Now that we have a graph, we can add an agent to the scene.

Create a new GameObject and name it "Agent"
Place it somewhere on the ground
Attach the FollowerEntity component to the agent's root GameObject
If you do not have the Unity Entities package installed, the inspector will prompt you to install it.
The FollowerEntity requires the entities package, but there are other movement scripts in the package that don't.
Add a Cylinder object as a child of the agent, and move it to (0,1,0). This will make it line up with the FollowerEntity's bounds.

Attach the AIDestinationSetter component to the agent.
We'll also need a target for the agent to move to.
Create a new Sphere object, name it Target.
Place it somewhere in the scene, where you want the agent to move.
Assign the Target GameObject to the "Target" field on the AIDestinationSetter component.
Now, if you press play, the agent should move towards the target.
Improving the navmesh
Or navmesh is pretty good, but there are some improvements we can make to it still.
Ignore the agent when scanning the graph
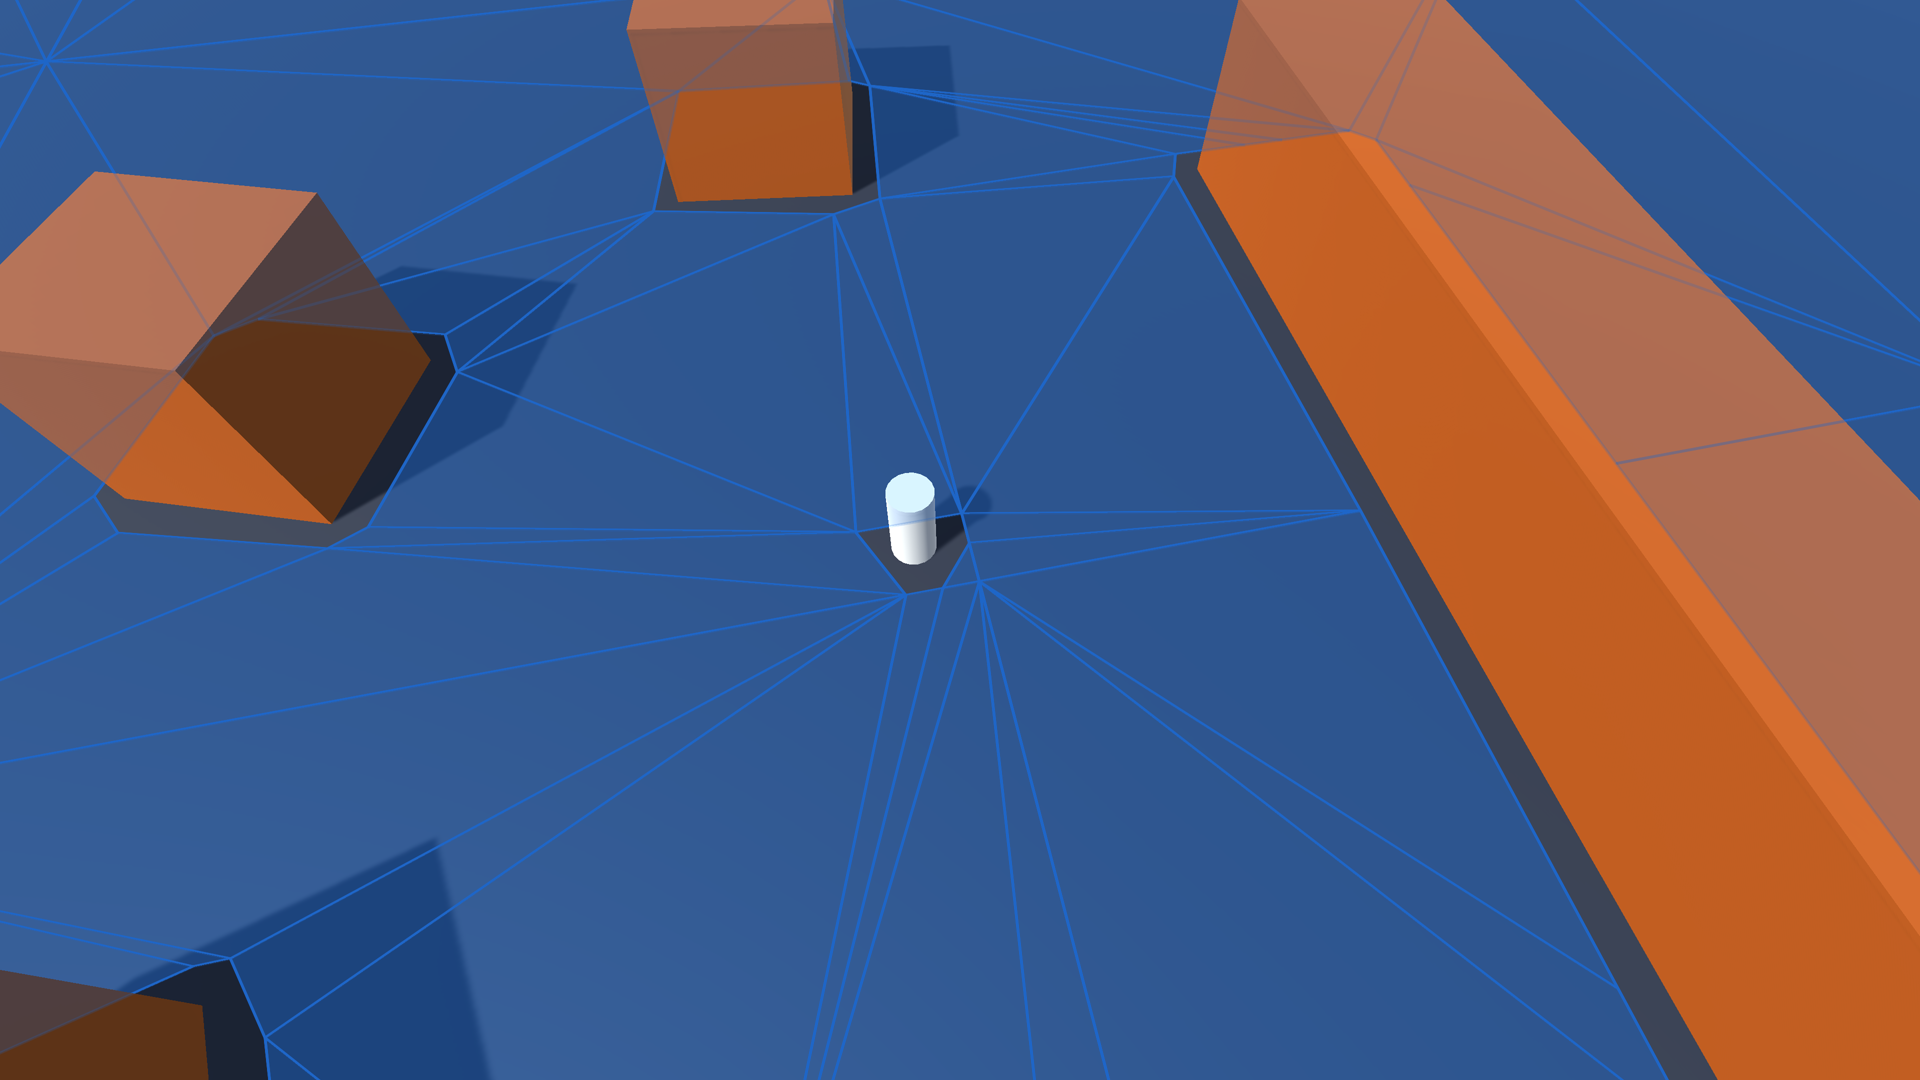
We can fix this by moving the agent to a separate layer, and then excluding that layer from the recast graph.
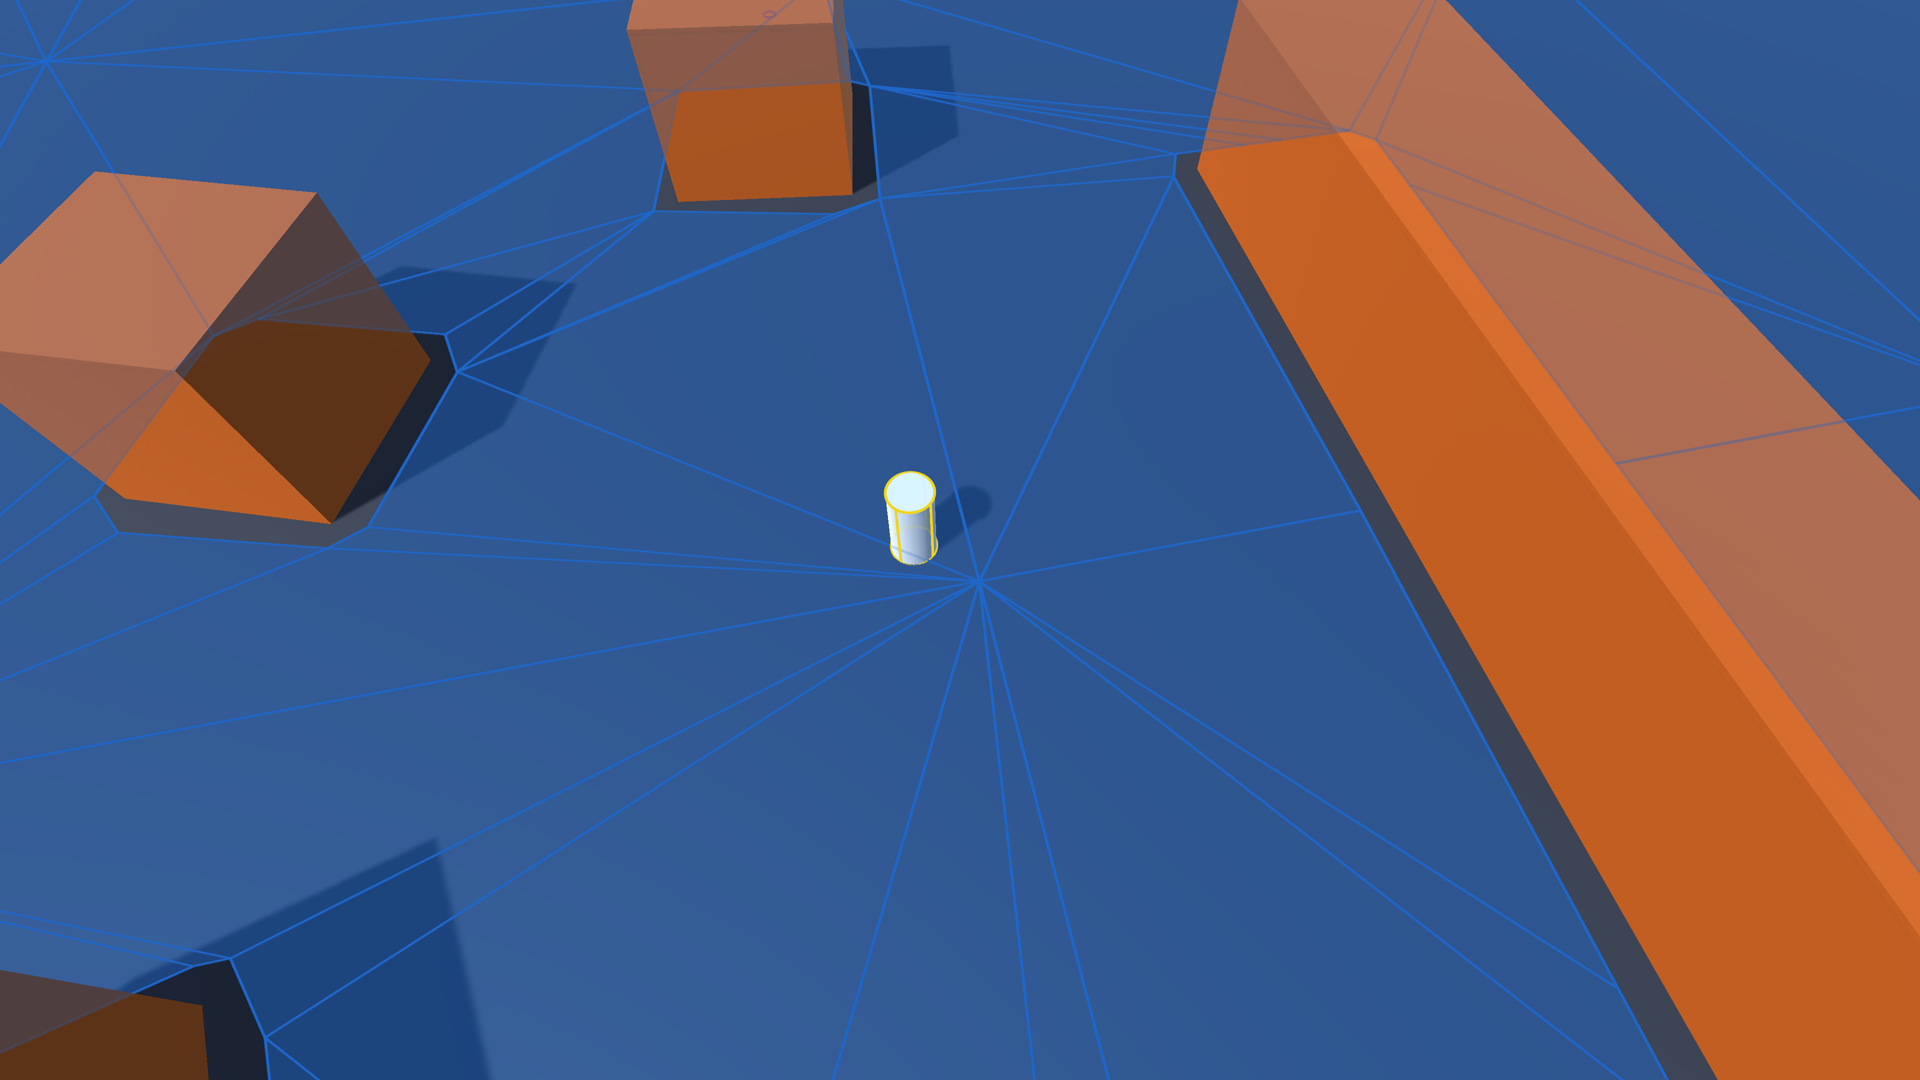
Move the agent to a separate layer. For example "TransparentFX", if you have the default unity layers. Any layer other than the default will do.
Change the layer mask in the recast graph settings to exclude the layer that the agent is on.
Scan the graph again. You should now see that the agent does not leave a hole in the navmesh.
Make the tops of the cubes unwalkable
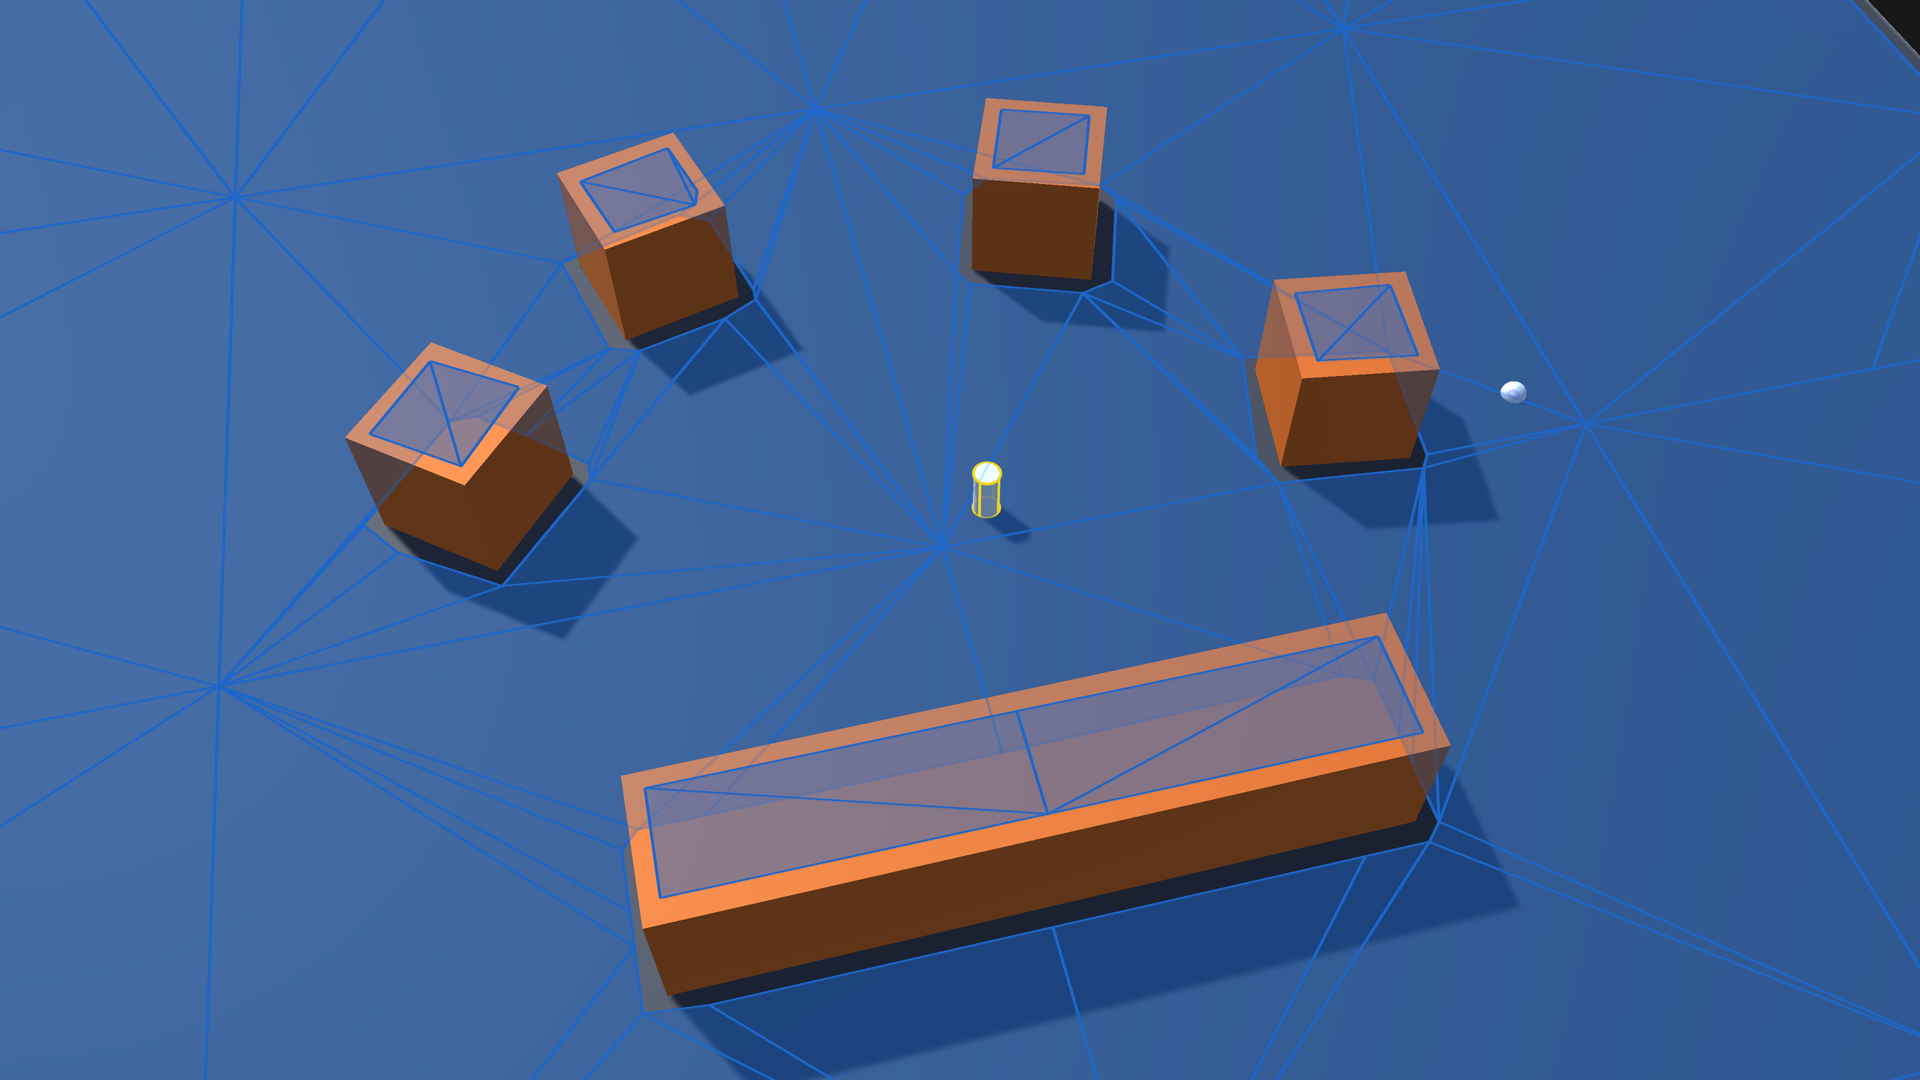
We can solve this in two ways.
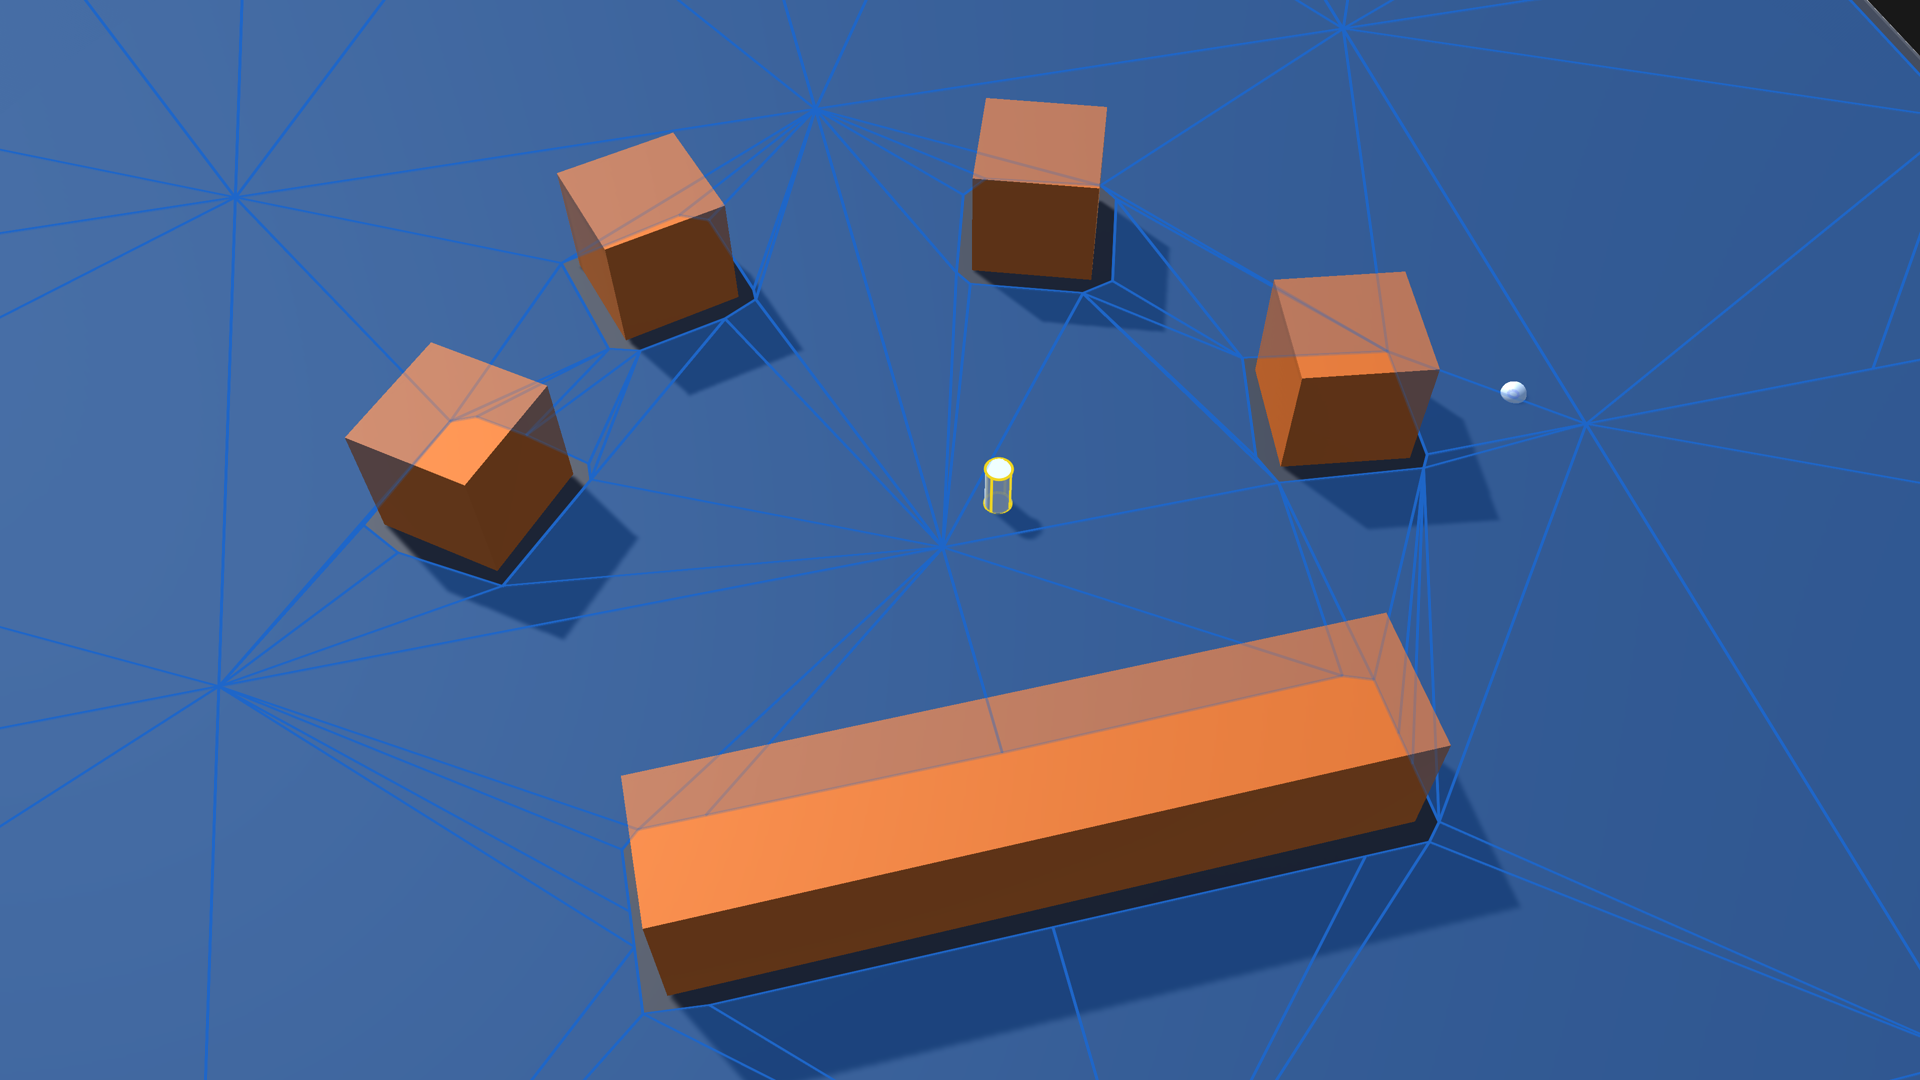
Place the obstacles on a separate layer, and then use the Per Layer Modifications setting on the recast graph to mark the surfaces of those cubes as unwalkable.
Or, select all obstacles, and add the RecastNavmeshModifier component to them. Then set the "Geometry Source" to Collider, and "Surface Type" to Unwalkable Surface.
Both of these methods will have the same result: the agent will no longer be able to walk on top of the obstacles.
RecastNavmeshModifier for more information about how to use it.
Updating recast graphs
Recast graphs can be updated during runtime in several ways:
You can scan the graph, to recalculate it from scratch. This is the most expensive way to update the graph, and is typically done if your whole world changes.
You can use navmesh cutting to carve out holes in the graph. This is a pretty fast, and is suitable for dynamic obstacles. However, it can only remove parts of the graph, not add new parts.
You can recalculate a part of the graph, using the AstarPath.UpdateGraphs method. This is typically done if a small part of the world changes. The recast graph will recalculate only the tiles that are touched by the given bounding box.
You can use the ProceduralGraphMover component to move the graph around at runtime, scanning new parts of the graph as needed. This is suitable for large procedurally generated worlds.
Try out navmesh cutting
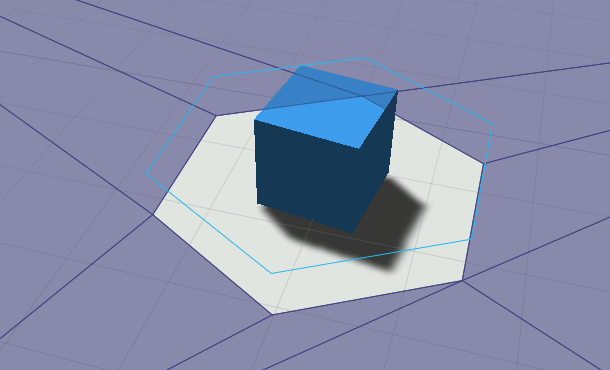
Create a new cube in the scene, name it "Cut", and place it somewhere on the navmesh.
Attach a NavmeshCut component to the cube.
Move the GameObject to the "TransparentFX" layer (or whichever layer you excluded from the recast graph earlier).
This is to exclude the cube from the input geometry when scanning the graph. The navmesh cut component will handle the cutting instead.
Scan the graph. You should now see that the navmesh has been cut where the cube is.
Move the cube around, you'll notice that the navmesh automatically updates, without you having to rescan the graph.
Try out updating the graph

Create a new cube in the scene, name it "Obstacle", and place it somewhere on the navmesh.
Attach a DynamicObstacle component to the cube.
Scan the graph. You should now see that the navmesh has been cut where the cube is.
Press play.
Move the cube around, you'll notice that the navmesh automatically updates, without you having to rescan the graph.
The DynamicObstacle component keeps track of the bounds of the cube, and calls AstarPath.UpdateGraphs whenever it moves.
Notice that the navmesh can be generated on top of this cube as well. These updates are not limited to just removing parts of the graph.
Conclusion
That marks the end of this tutorial. We have covered how to create a scene with some obstacles, add a recast graph to it, and then add an agent that can move around in the scene.
We have also covered the most important recast graph settings, as well as how to update the graph during runtime.