Multiple agent types
This page explains how to handle different agent types, such as agents of different sizes.
When you have agents of different sizes they usually cannot take the same routes to the target. Fortunately it is easy to solve this problem. The easiest way is to create multiple graphs, one for each type of agent. If you have a lot of different agent types, or perhaps even a continous spectrum, you may want to group them as having a large number of graphs will increase memory usage and scanning will take longer. On the Seeker component it is possible to set which graphs that the Seeker can use.
For grid graphs there are also two additional methods that can be used, they are explained in the Other approaches for grid graphs section.
Example
Lets say we have these two agents: 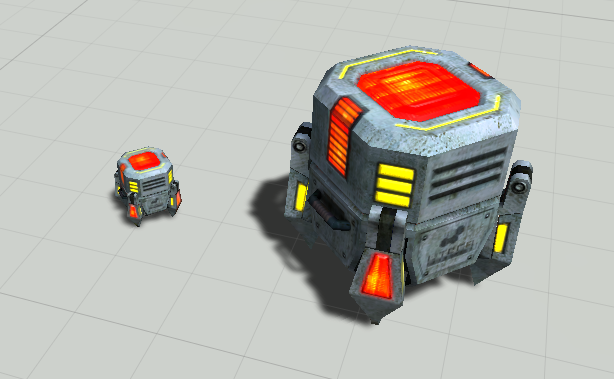
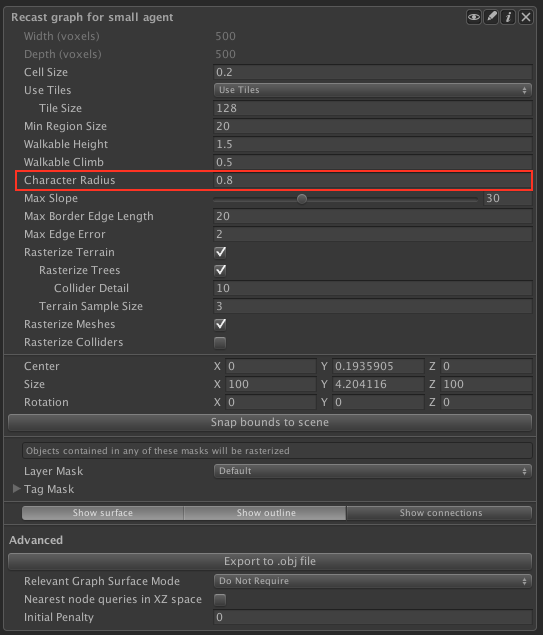
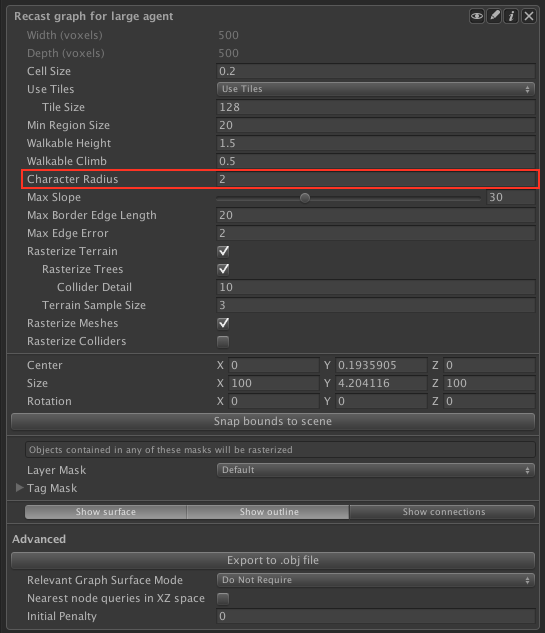
In the AstarPath inspector we can then create 2 different graphs, with the only difference being the character radius that is used (any other parameters can of course be changed if necessary). In this example a recast graph has been used, but this can just as easily be done with another graph type.
| |
When scanning these graphs we will get a result that looks something like this. With the graph for the smaller agent in blue and the graph for the larger agent in purple. 
On the Seeker component we can then set which graph each agent should use: 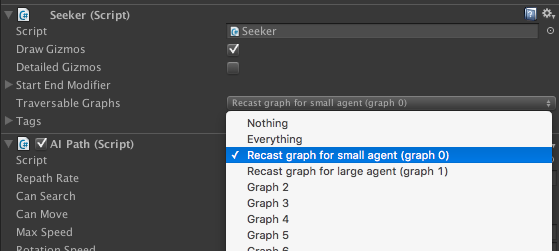
Now both agents will use graphs appropriate for their size:
Other approaches for grid graphs
As an alternative method on grid graphs it is possible to make the graph generate different tags depending on the distance to the nearest obstacle. This only requires a single graph.
There is also another approach that is very flexible, but unfortunately has a higher computational cost. For a path request one can supply an ITraversalProvider object (see also this tutorial: ITraversalProvider) which allows your code to determine exactly which nodes should not be traversable. Using this we can add custom code to instead of just checking if the current node is traversable, we can check all nodes around it as well in for example a 3x3 or 5x5 square (with the default being equivalent to a 1x1 square).
In the below image you can see it used with a 3x3 square. Note that it does not want to traverse the nodes right next to obstacles even though they are walkable, because it checks in a 3x3 square around it. 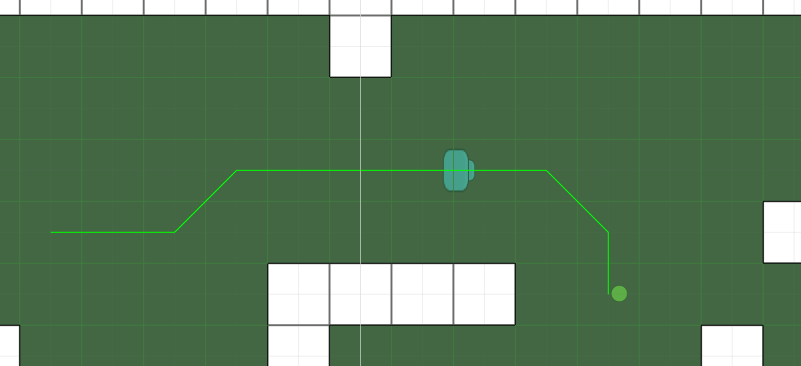
The major advantage of the ITraversalProvider approach is that it will handle all things that can make a node not be traversable. For example you might use different tags to restrict agent movement, however even if you use multiple graphs the different agents will still be able to walk right up to a region that is not traversable becasue of its tag even if the agent has a very large size. With this approach it will not be able to move as close to it because the nodes with another tag will be detected as not traversable and the NxN nodes around the agent must all be traversable.
The ITraversalProvider can be implemented like this: class GridShapeTraversalProvider : ITraversalProvider {
Int2[] shape;
public static GridShapeTraversalProvider SquareShape (int width) {
if ((width % 2) != 1) throw new System.ArgumentException("only odd widths are supported");
var shape = new GridShapeTraversalProvider();
shape.shape = new Int2[width*width];
// Create an array containing all integer points within a width*width square
int i = 0;
for (int x = -width/2; x <= width/2; x++) {
for (int z = -width/2; z <= width/2; z++) {
shape.shape[i] = new Int2(x, z);
i++;
}
}
return shape;
}
public bool CanTraverse (Path path, GraphNode node) {
GridNodeBase gridNode = node as GridNodeBase;
// Don't do anything special for non-grid nodes
if (gridNode == null) return DefaultITraversalProvider.CanTraverse(path, node);
int x0 = gridNode.XCoordinateInGrid;
int z0 = gridNode.ZCoordinateInGrid;
var grid = gridNode.Graph as GridGraph;
// Iterate through all the nodes in the shape around the current node
// and check if those nodes are also traversable.
for (int i = 0; i < shape.Length; i++) {
var inShapeNode = grid.GetNode(x0 + shape[i].x, z0 + shape[i].y);
if (inShapeNode == null || !DefaultITraversalProvider.CanTraverse(path, inShapeNode)) return false;
}
return true;
}
public bool CanTraverse (Path path, GraphNode from, GraphNode to) {
return CanTraverse(path, to);
}
public uint GetTraversalCost (Path path, GraphNode node) {
// Use the default traversal cost.
// Optionally this could be modified to e.g taking the average of the costs inside the shape.
return DefaultITraversalProvider.GetTraversalCost(path, node);
}
// This can be omitted in Unity 2021.3 and newer because a default implementation (returning true) can be used there.
public bool filterDiagonalGridConnections {
get {
return true;
}
}
}
Note
This implementation only works for grid graphs, not layered grid graphs
and can be used like this
ABPath path = ABPath.Construct(currentPosition, destination, null); Note that a drawback with both of the grid specific approaches is that if you happen to try to request a path to a destination that cannot be reached, then the path will fail completely instead of making the AI move to the closest point it could get. You can solve this for some cases by setting the calculatePartial field to true before you start calculating the path:
path.traversalProvider = GridShapeTraversalProvider.SquareShape(3);
// If you are writing your own movement script
seeker.StartPath(path);
// If you are using an existing movement script (you may also want to set ai.canSearch to false)
// ai.SetPath(path);
path.calculatePartial = true; This will make it go to the closest node it can get to as long as the target node is a traversable node according to the ITraversalProvider.