Grid Graph Rules
Contents
Overview
The GridGraph has a flexible system of rules that can be applied. These rules modify the nodes in various ways. For example a rule can apply a tag to a node based on the layer of the GameObject below the node, or it can apply a penalty to the node based on the slope of the surface.
The available rules are
You can add new rules by clicking the "Add Rule" button in the GridGraph inspector. 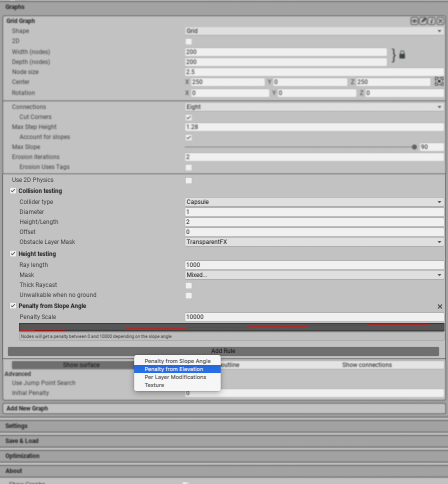
Adding rules using a script
You can also add rules from a script:
// Get the first grid graph in the scene
var gridGraph = AstarPath.active.data.gridGraph;

gridGraph.rules.rules.Add(new RuleAnglePenalty {
    penaltyScale = 10000,
    curve = AnimationCurve.Linear(0, 0, 90, 1),
});
Writing a custom grid graph rule
Sometimes you want to modify the scanning process in some way. You could iterate through all the nodes after the graph has been scanned and apply whatever modifications you want, but this adds complexity and doesn't play nicely with graph updates.
When writing the logic as a grid graph rule it will work seamlessly with graph updates and scripts such as the ProceduralGridMover. And you can easily use the Unity Job system and the Burst compiler to speed up the code. There are also some helper methods included to make it very easy to for example make a filter for which connections in the grid should be valid and which ones are not valid.
using UnityEngine;
using Unity.Collections;
using Pathfinding;

// Mark with the Preserve attribute to ensure that this class is not removed when bytecode stripping is used. See https://docs.unity3d.com/Manual/IL2CPP-BytecodeStripping.html
[Pathfinding.Util.Preserve]
public class RuleSkeleton : GridGraphRule {
    public override void Register (GridGraphRules rules) {
        // The Register method will be called once the first time the rule is used
        // and it will be called again if any settings for the rule changes in the inspector.
        // Use this part to do any precalculations that you need later.

        // Hook into the graph scanning/updating process
        rules.Add(Pass.BeforeConnections, context => {
            // Schedule jobs here

            // This callback is called when scanning the graph and during graph updates.
            // The only thing we do is to schedule a job using the Unity job system.
            // You do not have to deal with dependencies yourself
            // just make sure you use the appropriate [ReadOnly] or [WriteOnly] tags
            // See https://docs.unity3d.com/Manual/JobSystem.html for more info.
            // The context.data object contains all the node data as NativeArrays
        });
    }
}
Above you can find sksleton code for a rule. You can place this anywhere and it will show up when clicking the "Add Rule" button in the GridGraph inspector.
Every rule also needs a corresponding editor script to be able to show its settings. You should place this script in an Editor folder. You can find an example of such as script in the Node modifiers section.
See
In the callback for when the rule is being executed you get a context object with a lot of data about the graph. Take a look at the Pathfinding.GridGraphRules.Context class for more info about what data there is to use. In particular the data field of that class which is an instance of the Pathfinding.GridGraph.GridGraphScanData class.
Passes
There are several places where your script can hook into the scanning process. These are known as passes and identified by the Pathfinding.GridGraphRule.Pass enum. Usually you will use the BeforeConnections pass, but in some cases you may want to do other things.
Where in the scanning process a rule will be executed.
In the following sections a few examples of rules will be shown. Note that each one needs an editor script like the one above.
Node modifiers
If you want to modify every node independently you can use the ForEachNode helper function. If your job struct implements the GridGraphRule.INodeModifier interface it will be called once for every relevant node. Note that during graph updates only a small number of nodes may be updated.
using UnityEngine;
using Unity.Collections;
using Pathfinding;
using Pathfinding.Jobs;
using Unity.Jobs;
using Unity.Burst;

[Pathfinding.Util.Preserve]
public class RuleExampleNodes : GridGraphRule {
    public float perlinNoiseScale = 10.0f;
    public float perlinNoiseThreshold = 0.4f;

    public override void Register (GridGraphRules rules) {
        rules.Add(Pass.BeforeConnections, context => {
            new JobExample {
                bounds = context.data.bounds,
                nodeWalkable = context.data.nodeWalkable,
                nodePositions = context.data.nodePositions,
                perlinNoiseScale = perlinNoiseScale,
                perlinNoiseThreshold = perlinNoiseThreshold,
            }.Schedule(context.tracker);
        });
    }

    [BurstCompile]
    struct JobExample : IJob, INodeModifier {
        public IntBounds bounds;
        public float perlinNoiseScale;
        public float perlinNoiseThreshold;

        [WriteOnly]
        public NativeArray<bool> nodeWalkable;
        [ReadOnly]
        public NativeArray<Vector3> nodePositions;

        public void Execute () {
            ForEachNode(bounds, ref this);
        }

        public void ModifyNode (int dataIndex, int dataX, int dataZ) {
            var position = nodePositions[dataIndex];

            nodeWalkable[dataIndex] = Mathf.PerlinNoise(position.x / perlinNoiseScale, position.z / perlinNoiseScale) > perlinNoiseThreshold;
        }
    }
}
And the corresponding editor script looks like:
using UnityEditor;
using UnityEngine;

namespace Pathfinding {
    [CustomGridGraphRuleEditor(typeof(RuleExampleNodes), "Simple Example Rule")]
    public class RuleExampleNodesEditor : IGridGraphRuleEditor {
        public void OnInspectorGUI (GridGraph graph, GridGraphRule rule) {
            var target = rule as RuleExampleNodes;

            target.perlinNoiseScale = EditorGUILayout.FloatField("Noise Scale", target.perlinNoiseScale);
            target.perlinNoiseThreshold = EditorGUILayout.FloatField("Noise Threshold", target.perlinNoiseThreshold);
        }

        public void OnSceneGUI (GridGraph graph, GridGraphRule rule) { }
    }
}
The above code will make the nodes walkable or unwalkable using perlin noise.
Note
Normally when the Unity Job System is used you have to specify the dependencies of the jobs manually. This is tedious and error prone, so a helper script is used which will read the [ReadOnly] and [WriteOnly] attribtes that you use on fields in the job structs and automatically calculate the dependencies for you. For more info take a look at the Pathfinding.Jobs.JobDependencyTracker class.
Connection filters
Another common situation is that you want to control which node connections are traversable and which ones are not. You can do this easily with the IConnectionFilter interface and the FilterNodeConnections function.
using UnityEngine;
using Unity.Collections;
using Pathfinding;
using Pathfinding.Jobs;
using Pathfinding.Jobs.Grid;
using Unity.Jobs;
using Unity.Burst;
using Unity.Mathematics;

[Pathfinding.Util.Preserve]
public class RuleExampleConnection : GridGraphRule {
    public override void Register (GridGraphRules rules) {
        rules.Add(Pass.AfterConnections, context => {
            new JobExample {
                bounds = context.data.bounds,
                nodeConnections = context.data.nodeConnections,
                nodeWalkable = context.data.nodeWalkable,
                nodePositions = context.data.nodePositions,
                layeredDataLayout = context.data.layeredDataLayout,
            }.Schedule(context.tracker);
        });
    }

    [BurstCompile]
    struct JobExample : IJob, IConnectionFilter {
        public IntBounds bounds;
        public NativeArray<int> nodeConnections;

        [WriteOnly]
        public NativeArray<bool> nodeWalkable;
        [ReadOnly]
        public NativeArray<Vector3> nodePositions;
        public bool layeredDataLayout;

        public void Execute () {
            FilterNodeConnections(bounds, nodeConnections, layeredDataLayout, ref this);
        }

        public bool IsValidConnection (int dataIndex, int dataX, int dataZ, int direction) {
            // Find the data index of the adjacent node
            var neighbourDataIndex = GetNeighbourDataIndex(bounds, nodeConnections, layeredDataLayout, dataIndex, direction);

            // Get our position and the adjacent node's position
            var position = nodePositions[dataIndex];
            var neighbourPosition = nodePositions[neighbourDataIndex];

            // Only allow a connection if the adjacent node differs less
            // than 1 meter from this one along the Y coordinate.
            // This is similar to the "Max Climb" in the GridGraph settings.
            return math.abs(position.y - neighbourPosition.y) < 1.0f;
        }
    }
}
The IsValidConnection method will be called for every connection that is being updated. It will only be called for connections that are valid at that point in the scanning process. This means that you cannot enable connections that were previously disabled.
Note
Sometimes you will see coordinates like dataX and dataZ. These refer to the x and z coordinates in the NativeArrays used in this graph update/scan. These may not correspond to the x and z coordinates in the actual graph since graph updates usually only affect a small portion of the graph. You can convert them to the grid x and z coordinates like this: gridX = dataX + bounds.xmin;
gridZ = dataZ + bounds.ymin;