Using navmeshes
Getting Started with the A* Pathfinding Project - Part 2 - Navmeshes.
This tutorial covers both normal navmesh graphs, i.e those modelled by hand, as well as navmeshes automatically generated using a recast graph. Both parts can be useful to learn about regardless of which type of graph you end up using in your game, so I recommend that you read both of them.
What is a navmesh?
In the first part of this tutorial we used the Grid Graph. But the A* Pathfinding Project has support for more than one type of graphs, it also supports navmesh graphs.
A GridGraph consists of a bunch of nodes arranged in a grid-like pattern, it is very structured and thus works for most things you throw at it. But doesn't it feel like a waste of nodes to generate a huge number of nodes for your large open grass field you are using in your game, just to be able to get enough precision to represent the small obstacles around the farmers house (or whatever). Wouldn't it be better to use a few nodes to represent the large field and then more nodes for the smaller obstacles. This is where navmeshes come in. Navmeshes represent the world using polygons (more specifically triangles in this case), much like other meshes you have in your game. Navmeshes are used to accurately describe the surface that the character(s) can walk on.

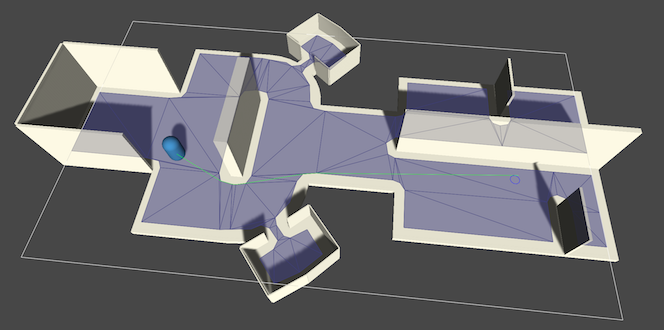
Like you see in the above image, the navmesh does not have equally sized nodes, but nodes can be as large or as small as you want them to be. The end result is that navmeshes can more accurately describe the environment and are smaller because they do not need to waste a large number of nodes on empty areas. Because they are smaller, they are also usually faster to perform pathfinding on. Also, they can represent multilayered environments as opposed to normal grid graphs (but which is a feature of the LayeredGridGraph available in the pro version).
So what are the downsides? The main problem with navmesh graphs is that they take a long time to generate (or model, if you do it by hand). To scan a whole GridGraph as in the GridGraph example scene takes something like 100-200 ms (depending on the computer), to generate a recast graph (back to them later) easily takes a few seconds. They are also relatively static: when you have generated it, it is quite slow to update it, even just a very small part of the graph. It is possible to do limited fast updates of the graphs using navmesh cutting . For recast graphs it is also possible to recalculate individual tiles in it asynchronously (tiles will be explained in the recast tutorial further down) however this is still relatively slow.
Creating a navmesh
Navmeshes can be modelled by hand, or automatically generated. The automatic generation is only available in the pro version.
Take a look at one or both of these sub-tutorials in order to learn how to create a navmesh, either by hand or automatically.
Movement on a navmesh
In the previous tutorial we wrote a simple script for moving a character around. We could use the same script, but to get nicer movement I will introduce an included component which gives very nice movement on navmeshes (specifically navmeshes). It is called RichAI. Create a new GameObject and attach the RichAI component to it. It will automatically attach a Seeker. For visualization purposes, add a Capsule object as a child object to root. Move the capsule one unit up, so that the root GameObject will have its pivot point at the capsule's base, the RichAI script assumes that the pivot is at the feet of the character.
Take care that you remove the capsule collider (and any other colliders) from the character. Or you need to configure the mask field on the RichAI component to exclude those colliders. Why? Because the RichAI component by default uses raycasting to determine where the ground is, and if that raycast would hit a collider which was attached to itself, you would see weird behaviour (try for yourself). It also supports using the CharacterController component, but I do not recommend that if you are planning to have a lot of characters in the game because character controllers are relatively slow.
To tell the AI where it should move we need another script. Attach the AIDestinationSetter component to the same GameObject as the RichAI component is attached to. This script has a single Transform field called 'Target' and what this script will do is to tell the AI that it should move towards that object. Create another GameObject named "Target". Assign that object to the Target field on the AIDestinationSetter component.
Note
The screenshot below is of a slightly older version where the Target field was on the RichAI component instead of on the AIDestinationSetter component.
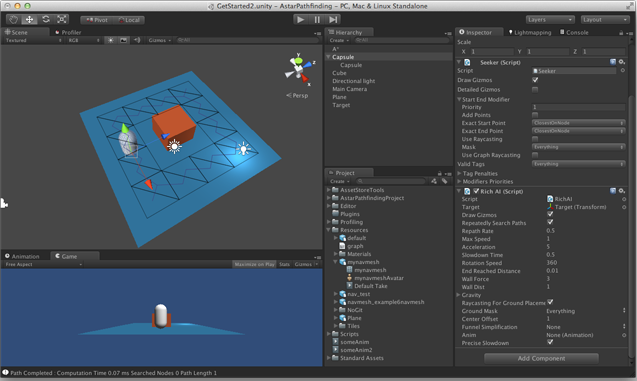
Now when pressing play you should see the agent moving towards the target. When moving the target object around, the agent should follow it.
The RichAI script is specially written for movement on navmesh graphs. It enforces that the agent stays on the navmesh at all times. As opposed to other movement scripts in this project, it does not have support for path modifiers. This is because it does not follow a list of waypoints, instead it follows a list of nodes. This has the advantage that the character can be pushed around by some amount and it will still move correctly without a path recalculation.
Describing every setting for the RichAI is too much for this tutorial, you can find documentation for it here: RichAI.
Notes about navmesh graphs
When not using the RichAI component, which has build in path simplification, it is recommended to attach the funnel modifier to the GameObject with the Seeker. The funnel modifier will simplify the path and make it much more aesthetically pleasing (and also shorter).
Navmesh graphs can sometimes give suboptimal paths. This is because pathfinding is carried out on node (triangle) centers. It happens mostly when the navmesh has very large and very small nodes (triangles) placed close to each other. The pathfinding then usually prefers the path with smaller triangles (sometimes the one with larger triangles, but not as common).
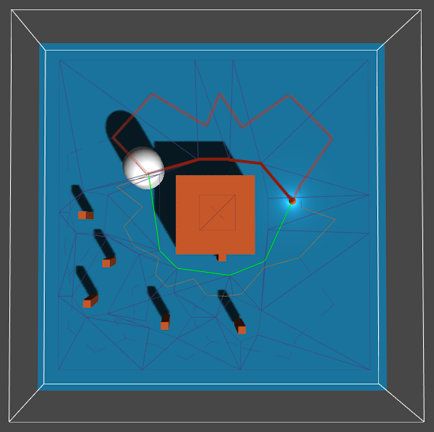
In the above image, the found path is shown in green, the nodes it passes through in pale orange. The actual shortest path is shown in red, with the nodes it passes through in pale red.
There is no silver bullet for this. Try to avoid very large triangles close to small ones. For recast graphs (see below), you can specify a lower tile size to split up very large triangles into smaller ones. And the Max Edge Length can be lowered as well.