Get Started With The A* Pathfinding Project
Get Started with the A* Pathfinding Project
Pathfinding is all about finding the best path between point A and B. This is what the A* Pathfinding Project does, in this tutorial you will learn how to set up the project in a new scene and get a simple AI moving while avoiding obstacles.
This AI you will write will not be very advanced, it is just the minimal amount of code needed to get moving and following a path. If you want a more advanced AI you can either extend the script you will write in this tutorial or use (or extend) the AIPath or RichAI scripts included in the package (see part 2 for basic usage of the RichAI component).
Downloading
The first thing you need to do, if you haven't done so already, is to download the A* Pathfinding Project
The project can be downloaded from here, you can either download the free version with some limited features (but still very powerful) or buy the pro version with more cool stuff included.
If you want, you can explore the different example scenes in the project before you start with the next section.
Javascript (Unityscript)
If you are using UnityScript, you should first follow the instructions on the page Working with Javascript.
All example code is in C#. But I hope it will not be too hard following them since C# and Unityscript are quite similar. You should know that UnityScript does not support optional parameters so you must always pass all parameters to a function. If you get an error message that the function you are trying to call has no such overload, this might be the problem. Then check the docs for all parameters and their default values.
Deploying for Mobile/UWP
Depending on which platform you are building for, you might want to read this page first: Deploying for mobile/uwp
Troubleshooting
At this stage, if you are getting any compiler errors from the code you can first check the Readme_upgrading.txt file included, if you are upgrading from an older version. A common problem is that classes in the A* Pathfinding Project have the same name as classes in your project. This can be solved either by renaming one of the classes, or placing your class in a namespace so it will not conflict with the other class anymore.
If you are still getting errors, take a look at the forums (see http://forum.arongranberg.com) to see if anyone else has the same problem or post a new question there.
Overview
The central script of the A* Pathfinding Project is the script 'astarpath.cs', it acts as a central hub for everything else.
In the AstarPath inspector you create all graphs and adjust all settings.
There should always be one (always one, no more) astarpath.cs component in a scene which uses Pathfinding.
The astarpath.cs script can be found at Menu bar–>Components–>Pathfinding–>PathfinderThe second most important component is the 'Seeker.cs' component, a Seeker component should be attached to every GameObject which uses Pathfinding (e.g all AIs).
The Seeker component handles path calls for one unit and post processes the paths. The Seeker isn't needed, but it makes Pathfinding easier.To make the AIs move there are a number of included movement scripts in the package (e.g AIPath, RichAI, AILerp). You may use one of the included ones or you can write your own (see Writing a movement script).
Lastly there are the modifier scripts (e.g SimpleSmoothModifier.cs). Modifiers post-processes paths to smooth or simplify them, if a modifier is attached to the same GameObject as a Seeker it will post-process all paths that Seeker handles. See Using Modifiers.
Video Tutorial
If you prefer a video tutorial instead of a text tutorial. Here is a video for you. The video tutorial takes a more high-level approach and you will learn how to use the built-in movement scripts instead of writing a custom one. Since the video and text tutorials cover slightly different ground, it is not a bad idea to take a look at both.
You can also take a look at the excellent tutorial by Gabriel Williams (Unity Cookie) in part 8 of the series on making a Tower Defence game: https://www.youtube.com/watch?feature=player_embedded&v=PUJSvd53v4k The video covers most things which will be discussed in the text tutorial.
New Scene
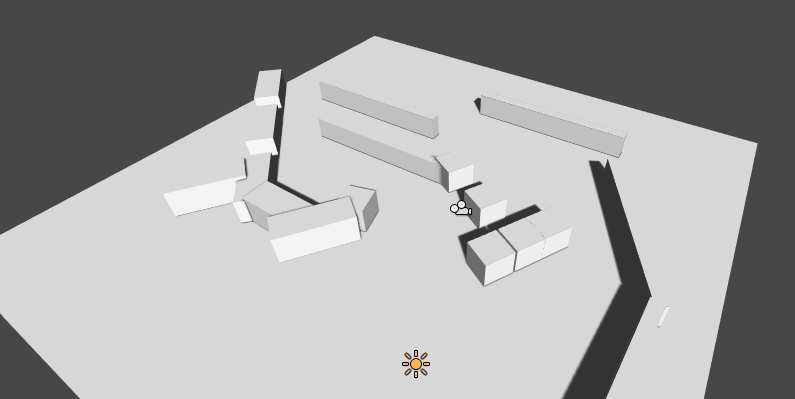
Create a new scene, name it "PathfindingTest". Now let's create something which an AI could walk on and something for it to avoid: add a plane to the scene, place it in the scene origin (0,0,0) and scale it to 10,10,10.
Create a new layer (Edit->Project Settings->Tags) named "Ground" and place the plane in that layer. Now create some cubes of differerent scales and place them on the plane, these will be obstacles which the AI should avoid. Place them in a new layer named "Obstacles".
Your scene should now look something like this:
Adding A*
Now we have ground for an AI to stand on and obstacles for it to avoid. So now we are going to add the A* Pathfinding System to the scene to enable Pathfinding.
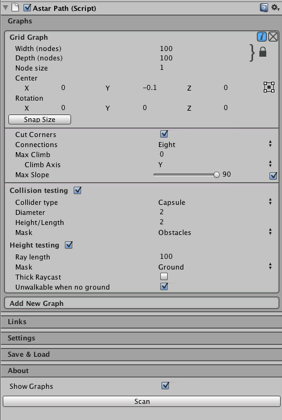
Create a new GameObject, name it "A*", add the "AstarPath" component to it (Menu bar–>Components–>Pathfinding–>Pathfinder).
The AstarPath inspector is divided into several parts. The two most important is the Graphs area and the Scan button at the bottom.
The Graphs area holds all the graphs in your scene, you may have up to 256 but usually 1 or 2 will be sufficient. A single graph is usually preferred for simplicity.
If you open the Graphs area by clicking on it you will see a list of graphs which you can add. I can't explain them all here but the two main ones is the Grid Graph which generates nodes in a grid pattern and the Recast Graph which automatically calculates a navmesh from the world (only available in the pro version).
The Scan button is for updating the graphs, this is also done on startup (unless the startup is cached, more about that in another part) and some graphs will do it automatically when changing the graph settings and the scanning won't cause any lag.
There is also a shortcut to use Cmd+Alt+S (mac) or Ctrl+Alt+S (windows).
For this tutorial we will create a Grid Graph, after adding it, click on the new Grid Graph label to bring up the graph inspector.
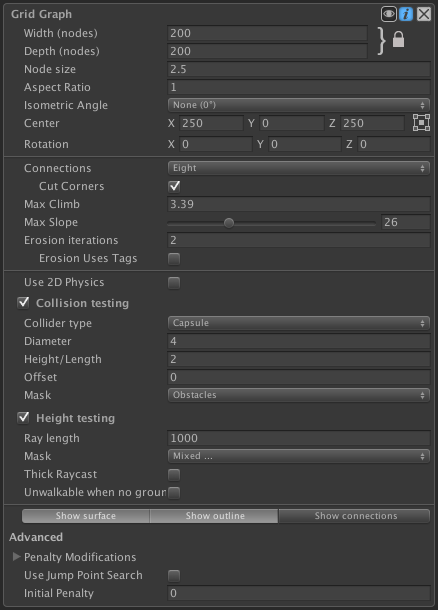
The Node Size variable determines how large a square/node in the grid is, for this tutorial you can leave it at 1, so the nodes will be spaced 1 unit apart.
The position needs to be changed though. Switch to bottom-left in the small selector to the right of the position field (currently named "Center"), then enter (-50,-0.1,-50). The -0.1 is to avoid floating point errors, in our scene the ground is at Y=0, if the graph was to have position Y=0 too, we might get annoying floating point errors when casting rays against it for example (like the height check does).
To make the grid fit our scene we need to change the width and depth variables, set both to 100 in this case. You can see that the grid is correctly positioned by the white bounding rectangle in the scene view which should now be enclosing the plane exactly.
Height Testing
In order to place the nodes at their correct height, the A* system fires off a bunch of rays against the scene to see where they hit. That's the Height Testing settings.
A ray, optionally thick (as opposed to a line), is fired from [Ray Length] units above the grid downwards, a node is placed where it hits. If it doesn't hit anything, it is either made unwalkable if the Unwalkable When No Ground variable is toggled or the node is placed at Y=0 relative to the grid if it is set to false.
We need to change the mask used, currently it includes everything, but that would include our obstacles as well, and we don't want that. So set the Mask to only include the "Ground" layer which we created earlier.
Collision Testing
When a node has been placed, it is checked for walkability, this can be done with a Sphere, Capsule or a Ray. Usually a capsule is used with the same diameter and height as the AI character which is going to be walking around in the world, preferably with some margin though.
Our AI will have the standard diameter and height of 1 and 2 world units respectively, but we will set the diameter and height for the collision testing to 2 and 2 to get some margin.
Next, to make the system aware of the obstacles we placed, we need to change the mask for the Collision Testing, this time set it to contain only the "Obstacles" layer as we wouldn't want our ground to be treated as an obstacle.
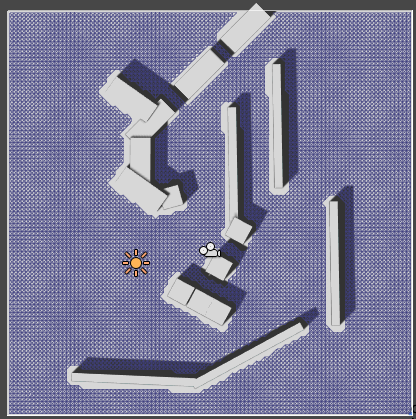
Now everything should be set up correctly to scan the graph.
Press Scan. Wait a fraction of a second and you've got a generated grid! (if you have done everything correctly, that is, compare your settings to the image below, also check that Show Graphs is true)
 |
 |
Adding the AI
What is a pathfinding test without some moving stuff? Not fun at all, so let's add an AI to play around with.
Create a capsule and add the Character Controller component to it, also place it somewhere visible on the plane.
Add the Seeker component to the AI, this script is a helper script for calling requesting paths from other scripts, it can also handle path modifiers which can e.g smooth the path or simplify it using raycasts.
There are 2 alternatives now. You can either write your own movement script or you can use one of the built-in movement scripts. I recommend following the tutorial for writing a custom movement script even if you end up using one of the built-in ones in your game because it makes it easier to understand how the system works under the hood.
Check out this subpage for the tutorial: Writing a movement script
There are also included movement scripts in the project which you can use if you don't want to write your own script. The included scripts are much more advanced than what you write in the tutorial linked above. The included scripts are called AIPath, RichAI and AILerp, the AIPath script can be used on any graph while RichAI is primarily for navmesh based graphs. While the AIPath and RichAI scripts follow the path loosely, the AILerp script uses interpolation to move along the path very precisely, but perhaps not in the most realistic way. Which one you use depends on your game. The different scripts are used in different example scenes, you can take a look at how they differ there.
For this tutorial you can attach the AIPath component to the AI. Create a new GameObject named "Target" and position it where you want the AI to move. Then attach the AIDestinationSetter component to the AI. This component is just a very simple helper script which will tell the AIPath script to move to a particular location. You will likely replace this script with your own game specific script in the future. The AIDestinationSetter component has a single field called "target", assign the "Target" GameObject that you created earlier to this field.
If you press play now the AI should move to the target. How the movement scripts work and how to configure them is explained in more detail in the video tutorial linked above. Take a look at that if something doesn't seem to work.
Smoothing
Now you have learned how to set up a simple grid graph and how to calculate paths Pathfinding, but surely there must be a way to get those paths to look a bit smoother?
Sure it is. Path smoothing and simplification scripts are called Path Modifiers and are scripts which can be added to the same GameObject as a Seeker.
The most straight forward one is the Simple Smooth modifier which can be found at Menu bar–>Components–>Pathfinding–>Modifiers–>Simple Smooth. Add that to our AI.
What this modifier is going to do, is to subdivide the path a number of times until each segment becomes smaller than the Max Segment Length variable. Then it will smooth the path by moving the points closer to each other. The modifier has a number of settings, I won't go through all of them here. See the SimpleSmoothModifier documentation for more info about each variable. For this tutorial you can set Max Segment Length to, say 1. Iterations to 5 and Strength to 0.25. Experiment with it to get good values.
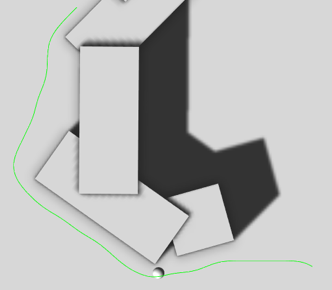
Now press play again, the path should look much smoother, just as we wanted.
Note
Smoothers don't usually take world geometry or the graph into account, so be careful with applying too much smoothing since that could cause paths to pass through unwalkable areas.
Another good modifier to use is the FunnelModifier which will simplify the path a great deal. This modifier is almost always used when using navmesh/recast graphs.
Read more about modifiers on the page Using Modifiers.
Logging settings
Every time a path is calculated by the system it can optionally be logged to the console. This can be a big help in understanding what the system is doing and also to spot performance issues. Logging is not free however, so for release builds it is recommended that you disable it.
You can change the logging settings under the A* Inspector -> Settings -> Debug tab.
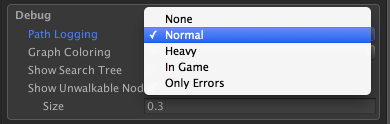
Use less debugging to improve performance (a bit) or just to get rid of the Console spam. Use more debugging (heavy) if you want more information about what the pathfinding scripts are doing. The InGame option will display the latest path log using in-game GUI.
The End
That was the end of the Get Started tutorial part 1. I hope you learned something from it.
From here on you can explore the rest of the documentation or dig straight in to the project.
If you want a little better AI, you can use the AIPath script which is included in the project.
You can continue with the next part of the get started tutorial, where we will use navmesh graphs: Using navmeshes
You can also take a look in the sidebar, there you will find a number of tutorials for how to use the package.
Good Luck!