Local Avoidance
How to use the local avoidance in the A* Pathfinding Project.
The local avoidance included in the A* Pathfinding Project is based on RVO: Reciprocal Velocity Obstacles. The implementation is sampling based and uses gradient descent to find the optimal velocity. It is well suited to for example human agents that move around. It is less well suited to vehicles that cannot change their velocity quickly.
A* Pro Feature:
This is an A* Pathfinding Project Pro feature only. This function/class/variable might not exist in the Free version of the A* Pathfinding Project or the functionality might be limited.
The Pro version can be bought here
Overview
The RVO system is divided into two parts. First there is the core simulation code. It is completely independent of Unity specific objects such as GameObjects and MonoBehaviours. The only really Unity specific classes it uses are math classes which are easily interchangeable. This core handles all simulation of rvo (local avoidance) agents.
The second part is the Unity interface. Many of those classes are just wrappers for the corresponding core classes. The RVOSimulator class is for example just a wrapper class for the Pathfinding.RVO.Simulator class. The Unity interface also contains helper classes for much easier local avoidance integration. One of those is the RVOController which you will probably use quite a lot. It is written to be similar to the Unity Character Controller, supporting functions such as Move and has properties such as velocity which you can easily access.
All of the scripts in the Unity interface part share common assumptions on how the scene should be set up: There should always be one (1) RVOSimulator in the scene, other scripts will look for it and get the core simulator instance it is a wrapper for. You can simply add it to any GameObject, edit the few settings if you want and it will work. You should never have more than one, all scripts which look for it use FindObjectOfType and there is no easy way to control exactly which of the multiple RVOSimulators it will return, so keep it to one for simplicity's sake.
Examples
There are three example scenes included which show how the local avoidance system works. You can find them in Assets/AstarPathfindingProject/ExampleScenes/Example11_RVO as well as in Assets/AstarPathfindingProject/ExampleScenes/Example16_RVO 2D.
Integration
The included AI scripts (AIPath, RichAI) support the RVOController out of the box, simply add the RVOController to a GameObject with an AIPath or RichAI component.
Version
In 3.x local avoidance didn't work well if a Rigidbody or CharacterController was also attached to the agent because the local avoidance system wanted full control over how the agent moved. In 4.x you can use it together with Rigidbody or CharacterController components. Keep in mind that the local avoidance system does not use colliders at all and will not try to avoid them.
The AILerp movement script is designed to interpolate along the path and follow it exactly, therefore makes no sense for it to deviate from the path and thus it does not support local avoidance.
If you want to use local avoidance with your own custom movement script or just want to learn more in depth about how it works. Take a look at this page:
Version
Prior to version 4.0 the RVOController handled movement by itself and worked much like Unity's CharacterController. However this turned out to be a design mistake as there would often be 2 components that wanted to handle movement (both the movement script such as AIPath and the RVOController) and this often lead to confusion.
Integration with physics
Often you want to have colliders on your agents, maybe to be able to hit them with bullets or something. However if you just add colliders (plus a rigidbody) to your agents you may see that the local avoidance quality goes down drastically in crowded scenarios. This is because when it is very crowded agents may overlap a tiny bit, the physics system will prevent that, but it will not do it in as nice a way as the local avoidance system, and this may lead to worse movement.
If you have colliders on your agents I recommend disabling collisions between the agents themselves to solve this. Put the agents in a separate layer and in the Unity physics settings you can disable collisions of that layer with itself. Note that Unity has separate settings for 2D and 3D physics, so make sure you change the right settings. 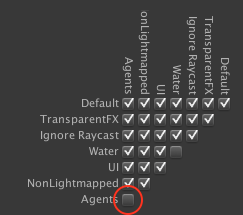
Keeping the agents on the navmesh
When using local avoidance, it is not hard to find cases where agents will manage to push other agents outside the graph. This is usually not desired, fortunately there are ways to mitigate this.
If you are using the RichAI script, this automatically happens because the way it does movement requires it. If you are using the AIPath script you can enable this using the constrainInsideGraph option.
There is also an alternative, which is to use the RVONavmesh component, that will add obstacles that the local avoidance system knows about for all borders of the graph. This has a slightly higher computational cost (in particular for larger graphs or if you update the graph during runtime) however it allows the local avoidance system to anticipate obstacles better instead of only finding out where a wall is when it has already crashed into it.
The script can be found at Components -> Pathfinding -> Local Avoidance -> RVO Navmesh. Add that to any GameObject in your scene and it will, when a graph is scanned or loaded add it's border as an RVO obstacle.
Note
The RVONavmesh component supports both navmesh, recast and grid graphs.
If you are updating the graphs often you may not want to use it as all RVO obstacles based on the graphs have to be rebuilt if any graph is updated. This can have a significant effect on performance.
You can visualize the obstacles added by the RVONavmesh component by toggling the 'Show Obstacles' checkbox on the RVOSimulator component. 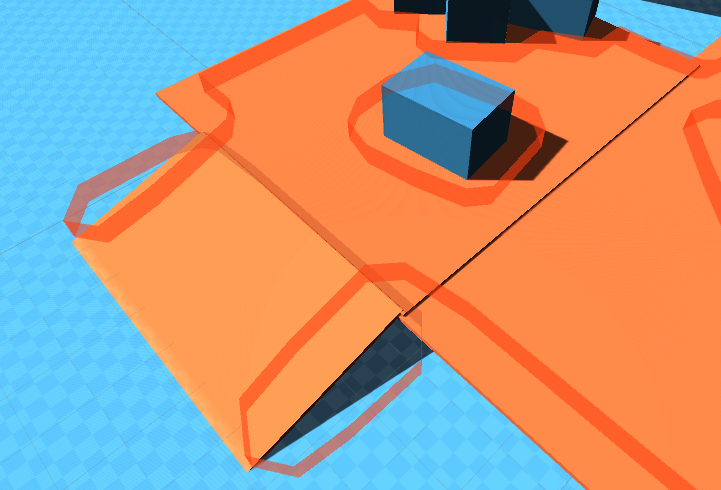
Below you can see an image where several agents using local avoidance were ordered to go to the same point in a corner. When not constraining the agents to the graph they are easily pushed inside obstacles. 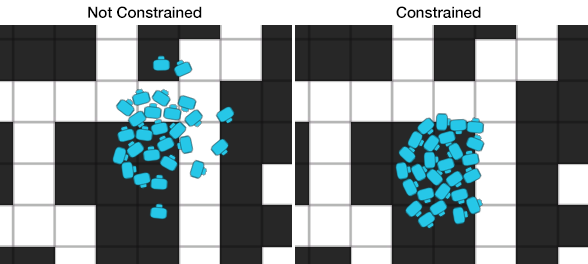
Number Crunching
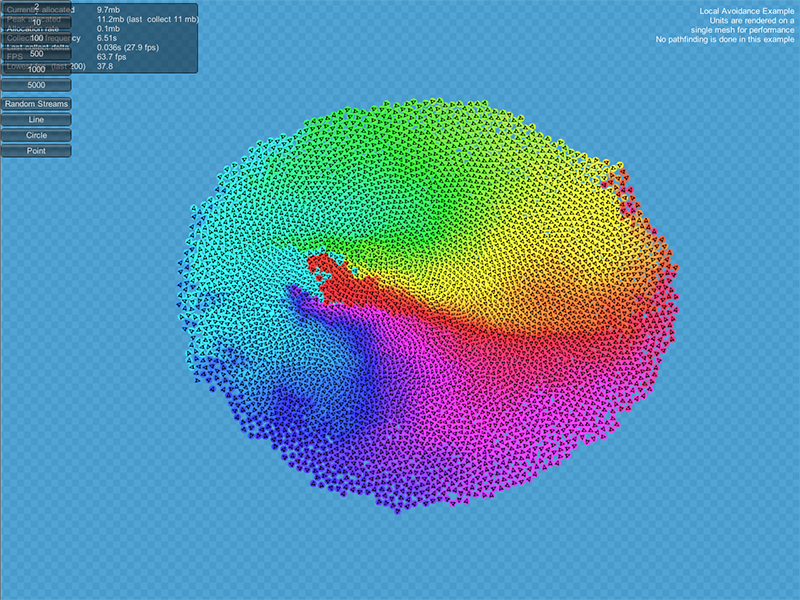
So how fast is this system then, you might wonder. It is very high performance. Especially if you take into account the fact that a local avoidance simulation does not need to run at a very high fps, that's just a waste of CPU cycles because the quality won't improve much. I have been able to simulate 5000 agents at a good fps on my computer (i7 processor). The local avoidance simulation ran at about 10 fps and the game ran at 50-100 fps mostly, with a lowest fps of around 30-40. The visualization for this simulation was done simply by creating a mesh which held one quad for each agent. The reason for this is that at such high numbers, creating a GameObject for every agent is really slow, just creating that many game objects took something like 10 seconds when I tested. The agents were setup in a circle and trying to reach their antipodal points. So it was basically as crowded as it can get.
However do not count on having this high number of agents in your game. These examples were very lightweight and in a game there is usually lots of overhead from many other things.
See below for a screenshot of the mentioned stress test: