|
A* Pathfinding Project
4.0.5
The A* Pathfinding Project for Unity 3D
|
|
A* Pathfinding Project
4.0.5
The A* Pathfinding Project for Unity 3D
|
Get Started with the A* Pathfinding Project
Pathfinding is all about finding the best path between point A and B. This is what the A* Pathfinding Project does, in this tutorial you will learn how to set up the project in a new scene and get a simple AI moving while avoiding obstacles.
This AI you will write will not be very advanced, it is just the minimal amount of code needed to get moving and following a path. If you want a more advanced AI you can either extend the script you will write in this tutorial or use (or extend) the AIPath or RichAI scripts included in the package (see part 2 for basic usage of the RichAI component).
If you like videos more than just text you can follow the excellent tutorial by Gabriel Williams (Unity Cookie) in part 8 of the series on making a Tower Defence game: http://www.youtube.com/watch?feature=player_embedded&v=PUJSvd53v4k The video covers most things which will be discussed in this tutorial.
The first thing you need to do, if you haven't done so already, is to download the A* Pathfinding Project
The project can be downloaded from here, you can either download the free version with some limited features (but still very powerful) or buy the pro version with more cool stuff included.
If you want, you can explore the different example scenes in the project before you start with the next section.
If you are using UnityScript, you should first follow the instructions on the page Working with Javascript.
All example code is in C#. But I hope it will not be too hard following them since C# and Unityscript are quite similar. You should know that UnityScript does not support optional parameters so you must always pass all parameters to a function. If you get an error message that the function you are trying to call has no such overload, this might be the problem. Then check the docs for all parameters and their default values.
Depending on which platform you are building for, you might want to read this page first: Deploying for mobile
At this stage, if you are getting any compiler errors from the code you can first check the Readme_upgrading.txt file included, if you are upgrading from an older version. A common problem is that classes in the A* Pathfinding Project have the same name as classes in your project. This can be solved either by renaming one of the classes, or placing your class in a namespace so it will not conflict with the other class anymore.
If you are still getting errors, take a look at the forums (see http://forum.arongranberg.com) to see if anyone else has the same problem or post a new question there.
Create a new scene, name it "PathfindingTest". Now let's create something which an AI could walk on and something for it to avoid: add a plane to the scene, place it in the scene origin (0,0,0) and scale it to 10,10,10.
Create a new layer (Edit->Project Settings->Tags) named "Ground" and place the plane in that layer. Now create some cubes of differerent scales and place them on the plane, these will be obstacles which the AI should avoid. Place them in a new layer named "Obstacles".
Your scene should now look something like this:
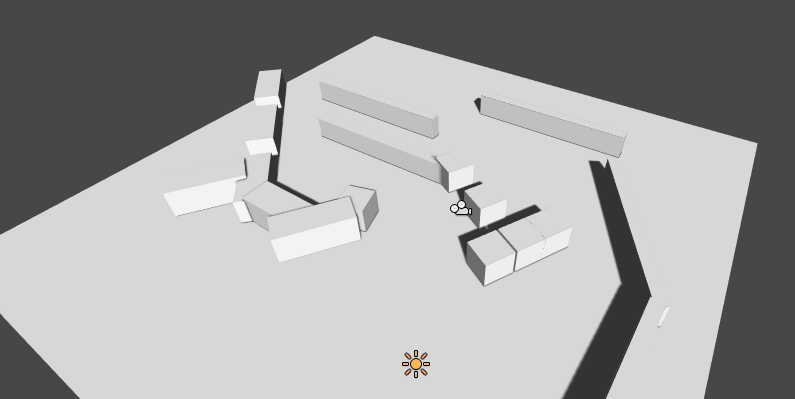
Now we have ground for an AI to stand on and obstacles for it to avoid. So now we are going to add the A* Pathfinding System to the scene to enable Pathfinding.
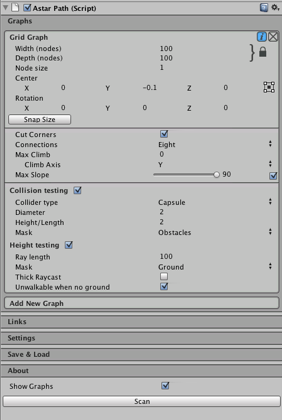
Create a new GameObject, name it "A*", add the "AstarPath" component to it (Menu bar–>Components–>Pathfinding–>Pathfinder).
The AstarPath inspector is divided into several parts. The two most important is the Graphs area and the Scan button at the bottom.
The Graphs area holds all the graphs in your scene, you may have up to 16 but usually 1 or 2 will be sufficient. A single graph is usually to be preferred.
If you open the Graphs area by clicking on it you will see a list of graphs which you can add. I can't explain them all here but the two main ones is the Grid Graph which generates nodes in a grid pattern and the Navmesh Graph which takes a mesh as the walkable area.
The Scan button is for updating the graphs, this is also done on startup (unless the startup is cached, more about that in another part) and some graphs will do it automatically when changing the graph settings and the scanning won't cause any lag.
There is also a shortcut to use Cmd+Alt+S (mac) or Ctrl+Alt+S (windows).
For this tutorial we will create a Grid Graph, after adding it, click on the new Grid Graph label to bring up the graph inspector.
In order to place the nodes at their correct height, the A* system fires off a bunch of rays against the scene to see where they hit. That's the Height Testing settings.
A ray, optionally thick (as opposed to a line), is fired from [Ray Length] units above the grid downwards, a node is placed where it hits. If it doesn't hit anything, it is either made unwalkable if the Unwalkable When No Ground variable is toggled or the node is placed at Y=0 relative to the grid if it is set to false.
We need to change the mask used, currently it includes everything, but that would include our obstacles as well, and we don't want that. So set the Mask to only include the "Ground" layer which we created earlier.
When a node has been placed, it is checked for walkability, this can be done with a Sphere, Capsule or a Ray. Usually a capsule is used with the same diameter and height as the AI character which is going to be walking around in the world, preferably with some margin though.
Our AI will have the standard diameter and height of 1 and 2 world units respectively, but we will set the diameter and height for the collision testing to 2 and 2 to get some margin.
Next, to make the system aware of the obstacles we placed, we need to change the mask for the Collision Testing, this time set it to contain only the "Obstacles" layer as we wouldn't want our ground to be treated as an obstacle.
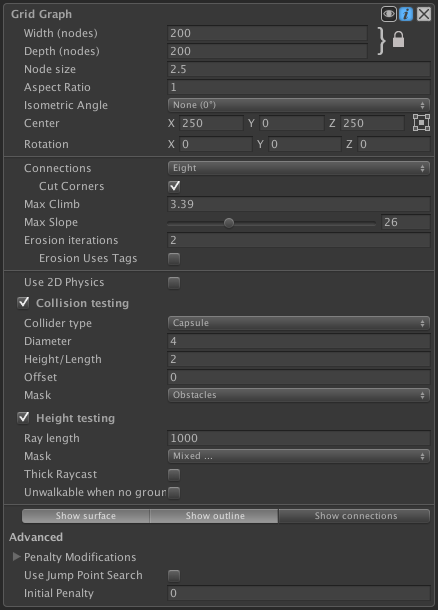
Now everything should be set up correctly to scan the graph.
Press Scan. Wait a fraction of a second and you've got a generated grid! (if you have done everything correctly, that is, compare your settings to the image below, also check that Show Graphs is true)
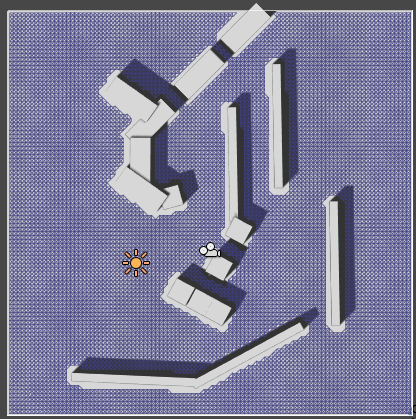 |  |
What is a pathfinding test without some moving stuff? Not fun at all, so let's add an AI to play around with.
Create a capsule and add the Character Controller component to it, also place it somewhere visible on the plane.
Add the Seeker component to the AI, this script is a helper script for calling requesting paths from other scripts, it can also handle path modifiers which can e.g smooth the path or simplify it using raycasts.
We are going to write our own, really simple script for moving the AI, so open your favourite script-editor and follow. There are also included movement scripts in the project which you can use if you don't want to write your own script. The included scripts are much more advanced than what we are going to write in this tutorial. The included scripts are called AIPath and RichAI, the AIPath script can be used on any graph while RichAI is primarily for navmesh based graphs.
The call to the Seeker is really simple, three arguments, a start position, an end position and a callback function (must be in the form "void SomeFunction (Path p)"):
So let's start our script with a simple snippet calling the pathfinder at startup:
Save it to a file in your project named AstarAI.cs and add the script to the AI GameObject.
In the inspector, change Target Position to something like (-20,0,22). This is the position the AI will try to find a path to now.
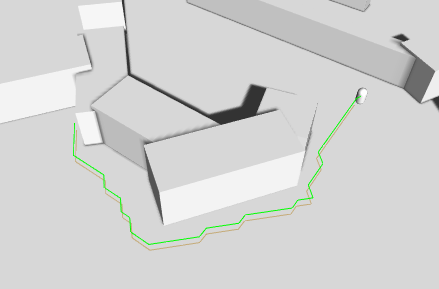
Press Play. You should get the log message and also the path should show in the scene view as a green line (the Seeker component draws the latest path using Gizmos).
If you do not see a green line, make sure that the checkbox Show Gizmos on the Seeker component is checked. More recent Unity versions also depth-test gizmos, so it might be hidden under the ground, to disable the depth-testing click the Gizmos button above the scene view window and uncheck the 3D Gizmos checkbox.
In case you get an error, make sure that the Seeker component really is attached to the same GameObject as the AstarAI script. If you still get an error, the target position might not be reachable, try to change it a bit.
What happens is that first the script calls the Seeker's StartPath function. The seeker will then create a new Path instance and then sent it forward to the AstarPath script (the Pathfinder component you added before). The AstarPath script will put the path in a queue. As soon as possible, the script will then process the path by searching the grid, node by node until the end node is found.
The searching step is explained really well in this tutorial here. It does not work exactly like in the tutorial, but the concept is the same.
Once calculated, the path is returned to the Seeker which will post process it if any modifiers are attached and then the Seeker will call the callback function specified in the call. The callback is also sent to Seeker.pathCallback which you can register to if you don't want to specify a callback every time you call StartPath:
When we get the calculatated path back, how can we get info from it?
A Path instance contains two lists related to that.
Path.vectorPath is a Vector3 list which holds the path, this list will be modified if any smoothing is used, it is the recommended way to get a path.
secondly there is the Path.path list which is a list of GraphNode elements, it holds all the nodes the path visisted which can be useful to get additonal info on the traversed path.
First though, you should always check path.error, if that is true, the path has failed for some reason. Path.errorLog will have more info on what went wrong in case path.error is true.
To expand our AI script, let's add some movement: Also add the CharacterController to the AI gameObject.
If you press play now, the AI will follow the calculated path, neat, eh?
What the code does is to, in FixedUpdate get the normalized direction towards the next waypoint, move towards it a bit, then it checks if it is close enough to continue to the next waypoint, in this example that is done by simply by incrementing the currentWaypoint index.
The AI will stop a short distance from the end point, but that's just because we haven't got any special logic for the last point.
Now you have learned how to set up a simple grid graph and how to call the Pathfinding, but surely there must be a way to get those paths to look a bit smoother?
Sure it is. Path smoothing and simplification scripts are called Path Modifiers and are scripts which can be added to the same GameObject as a Seeker.
The most straight forward one is the Simple Smooth modifier which can be found at Menu bar–>Components–>Pathfinding–>Modifiers–>Simple Smooth. Add that to our AI.
What this modifier is going to do, is to subdivide the path a number of times until each segment becomes smaller than the Max Segment Length variable. Then it will smooth the path by moving the points closer to each other. The modifier has a number of settings, I won't go through all of them here. See the SimpleSmoothModifier documentation for more info about each variable. For this tutorial you can set Max Segment Length to, say 1. Iterations to 5 and Strength to 0.25. Experiment with it to get good values.
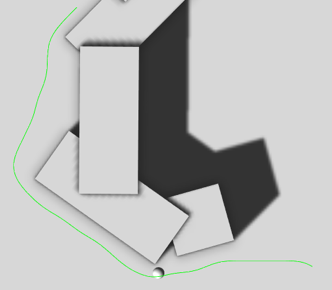
Now press play again, the path should look much smoother, just as we wanted.
Another good modifier to use is the FunnelModifier which will simplify the path a great deal. Read more about modifiers on the page Using Modifiers. You can see a list of all modifiers if you click on Modules above and go to "Modifiers".
That was the end of the Get Started tutorial part 1. I hope you learned something from it.
From here on you can explore the rest of the documentation or dig straight in to the project.
If you want a little better AI, you can use the AIPath script which is included in the project.
You can continue with the next part of the get started tutorial, where we will use navmesh graphs: Get Started Part 2
Look in the Related Pages tab, there you will find a number of tutorials and how-tos for how to use the package.
Good Luck!
 1.8.2
1.8.2 
